How to Build a Dog House: 10 Easy DIY Steps & Building Tips
Canine Bible is reader-supported. We receive affiliate commissions via some of our links. Learn more.
Building a dog house starts with choosing the right size, weather-safe materials, and a simple raised design that keeps your dog dry, shaded, and comfortable. A good dog house should be large enough for your dog to stand, turn around, and lie down, but not so large that it loses warmth in cool weather. The best design depends on your dog’s size, climate, yard setup, and how often your dog will use it. Many owners make the mistake of focusing only on appearance, but ventilation, insulation, drainage, and safe materials matter just as much. You also need to think about roof style, doorway placement, flooring, and whether the house should be portable or permanent. This guide walks you through building a practical dog house step by step while helping you avoid common design mistakes that can make it unsafe or uncomfortable.
What You Need to Build a Dog House
| Supply or Material | Why You Need It |
|---|---|
| Exterior plywood | Weather-resistant plywood creates sturdy walls, flooring, and roof panels for the dog house. |
| Framing lumber | Wood boards form the structure that supports the floor, walls, doorway, and roof. |
| Roofing material | Shingles, metal panels, or waterproof roofing sheets help protect the dog house from rain and sun. |
| Exterior screws | Outdoor-rated screws hold the structure together better than nails and resist rusting over time. |
| Non-toxic sealant | A pet-safe exterior sealant helps protect the wood from moisture without exposing your dog to unsafe chemicals. |
| Insulation | Rigid foam or safe insulated panels can help improve comfort in colder or very hot climates. |
| Basic tools | A saw, drill, measuring tape, level, pencil, and sandpaper are needed for cutting, assembling, and smoothing the house. |
How to Build a Dog House Safely at Home
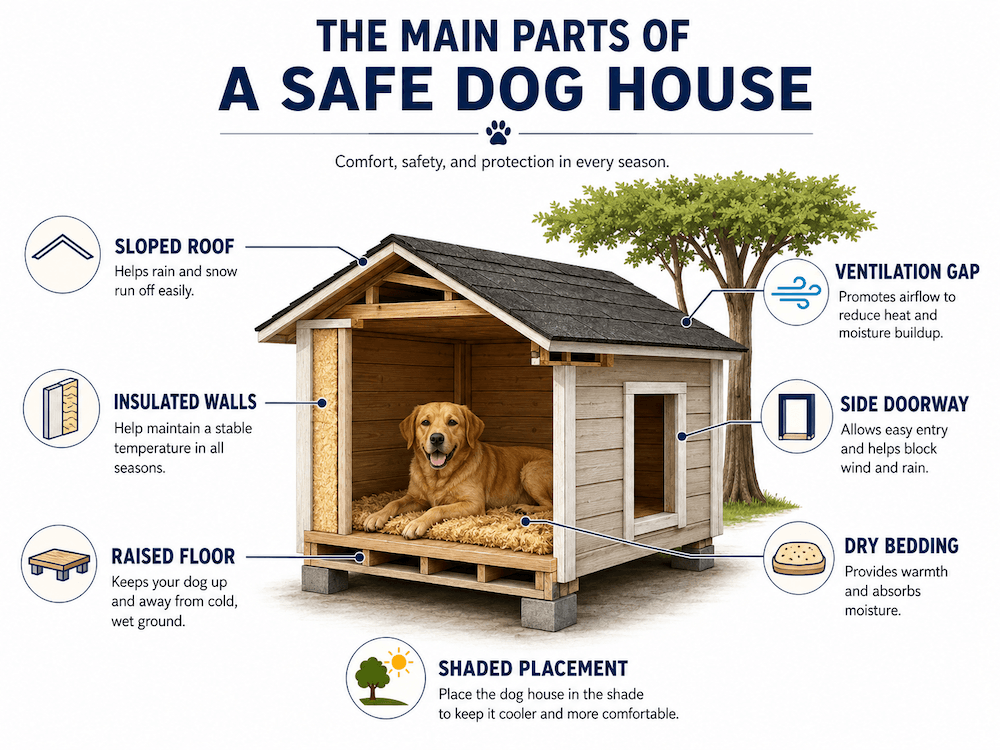
A safe dog house should be built with protection, stability, and comfort in mind, not just appearance. Before cutting wood or assembling panels, think about where the house will sit, how rainwater will drain, how air will move through it, and whether every surface your dog touches will be smooth, sturdy, and non-toxic.
The most important safety details are a raised floor, secure framing, a waterproof sloped roof, proper ventilation, and a doorway that helps block wind without trapping heat. Use pet-safe materials, cover or sand sharp edges, avoid exposed nails or screws, and choose finishes that can handle outdoor moisture without creating fumes or splinters.
Once built, place the dog house in a shaded, well-drained area where it stays dry and does not overheat. A dog house can provide outdoor shelter, but it should never replace supervision, fresh water, or bringing your dog indoors during extreme heat, cold, storms, or unsafe weather.
What to Know Before You Build a Dog House
A dog house should be planned around your dog first, not around leftover wood or a design that only looks nice. Measure your dog, check your climate, and decide whether the house will be used for short outdoor rests, daytime yard access, or colder-weather shelter.
It is also important to understand the limits of any outdoor shelter. Keep pets indoors when it is too cold, because dogs left outdoors can face serious risks, including freezing, injury, or becoming lost. Insulated, waterproof shelter and fresh water should be provided for dogs that spend significant time outside in colder months.


How Big Should a Dog House Be?
A dog house should feel like a protected den, not a cramped box or a giant shed. The dog should be able to stand, turn around, and lie down comfortably, while also warning that an oversized shelter can make it harder for a dog to retain warmth.
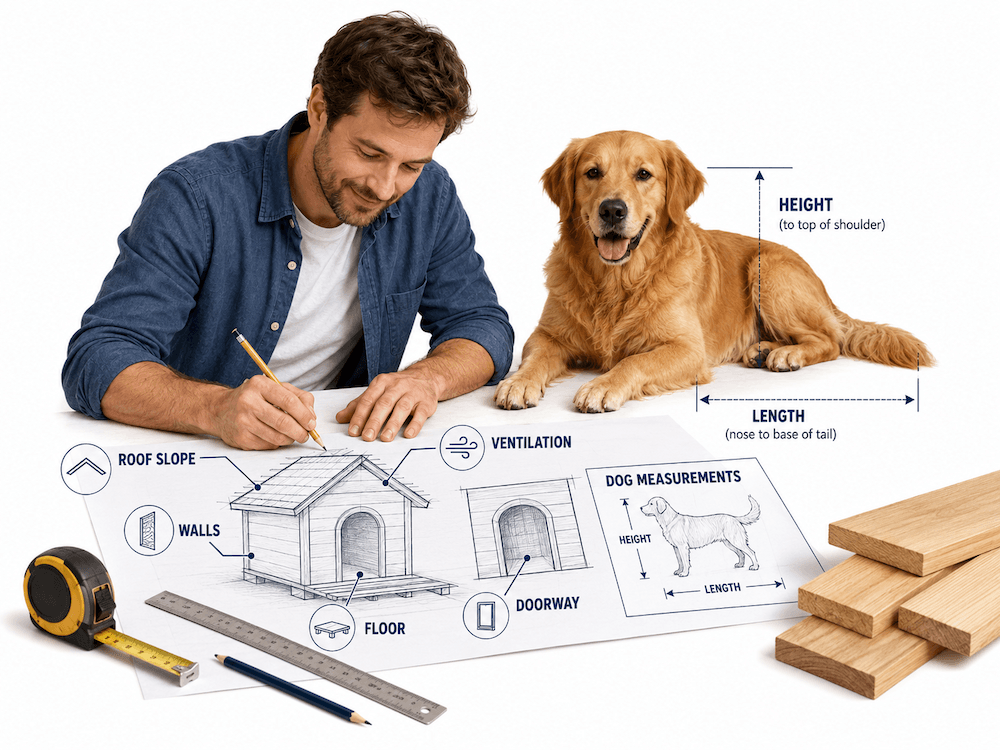
Measure your dog from nose to tail base, floor to shoulder or head height, and shoulder width. Then add enough clearance for natural movement while keeping the interior compact enough to feel cozy and efficient.
| Measurement | What to Measure | Practical Guideline |
|---|---|---|
| Length | Nose to tail base. | Add modest room for lying down comfortably. |
| Height | Floor to head or shoulder height. | Your dog should stand without crouching. |
| Width | Across the shoulders or chest. | Your dog should turn around easily. |
| Doorway | Shoulder width and standing height. | Make entry easy without oversizing the opening. |
| Floor height | Distance from ground to floor. | Raise it enough to avoid wet ground. |
| Roof overhang | Extension beyond the walls. | Add overhang to help shed rain. |
Where to Place a Dog House in Your Yard
Placement affects comfort as much as construction. A strong dog house can still become uncomfortable if it sits in direct sun, collects water, faces strong wind, or sits under unsafe branches. Choose the driest shaded area you can, with the doorway turned away from prevailing wind and rain.
How to Build a Dog House Step by Step
This simple build uses a raised rectangular base, framed walls, plywood panels, a side doorway, and a sloped roof. Adjust the size to your dog and climate, and keep all edges smooth and secure.
Step 1: Sketch the Dog House Plan
Start with a simple drawing that includes the floor, walls, doorway, roof slope, ventilation points, and overhang. Mark your dog’s measurements before cutting any wood. A plan helps you buy the right amount of plywood, lumber, screws, roofing material, and sealant. It also reduces the chance of building a house that is too small, too large, unstable, or hard to clean.
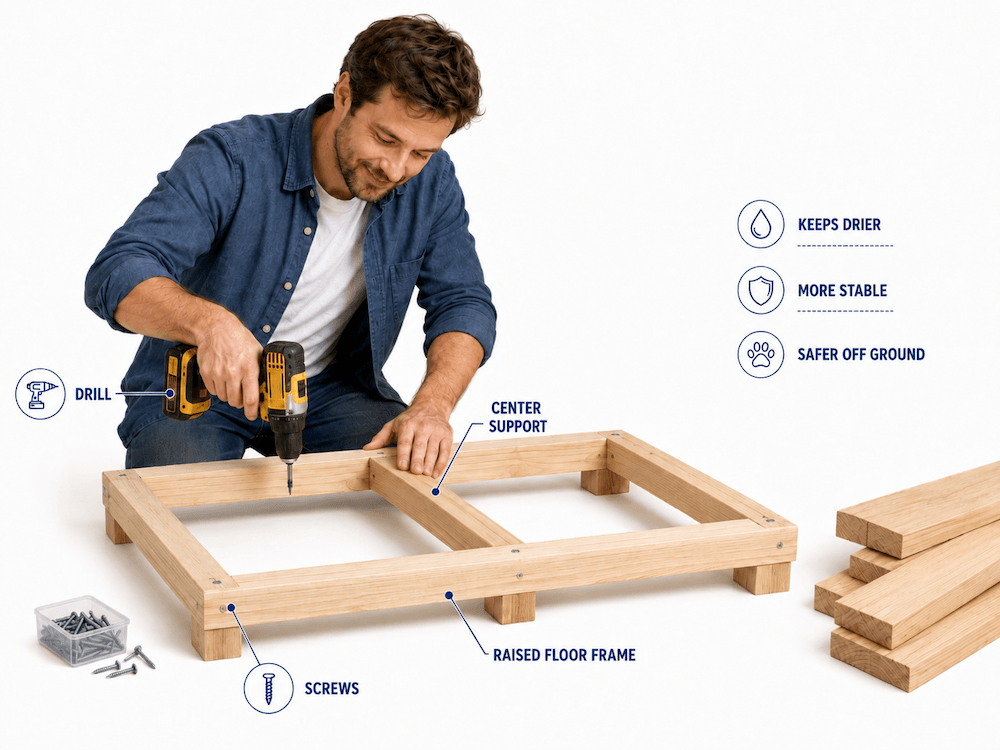
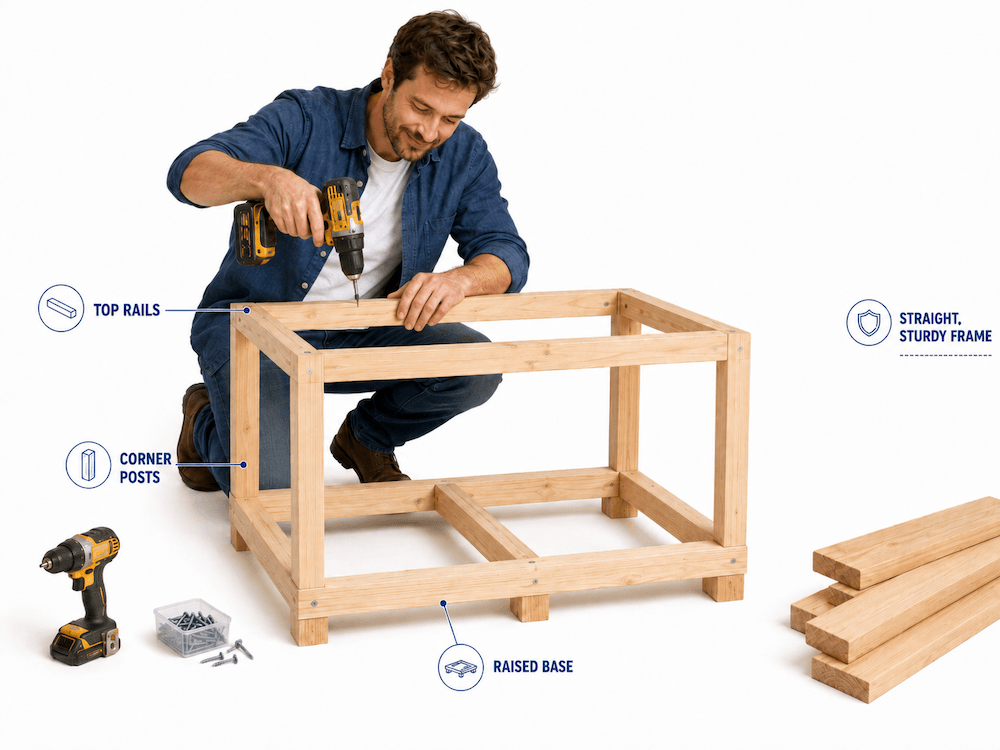
Step 2: Cut and Build the Raised Base
Build a rectangular frame with exterior lumber, then add a center support board to reduce floor sagging. Fasten the corners with outdoor-rated screws. Attach a smooth plywood floor panel to the frame. Raising the base helps keep the house out of mud, rain, snow, and damp soil, and lifting the floor also improves airflow and helps the shelter stay cooler in summer and drier in winter.
Step 3: Frame the Walls
Attach four corner posts to the base, then add top rails to connect the frame. The walls should feel sturdy before you add panels. Use a level to keep the frame straight. A wobbly frame can make the roof harder to attach and may create gaps where wind or rain can enter.
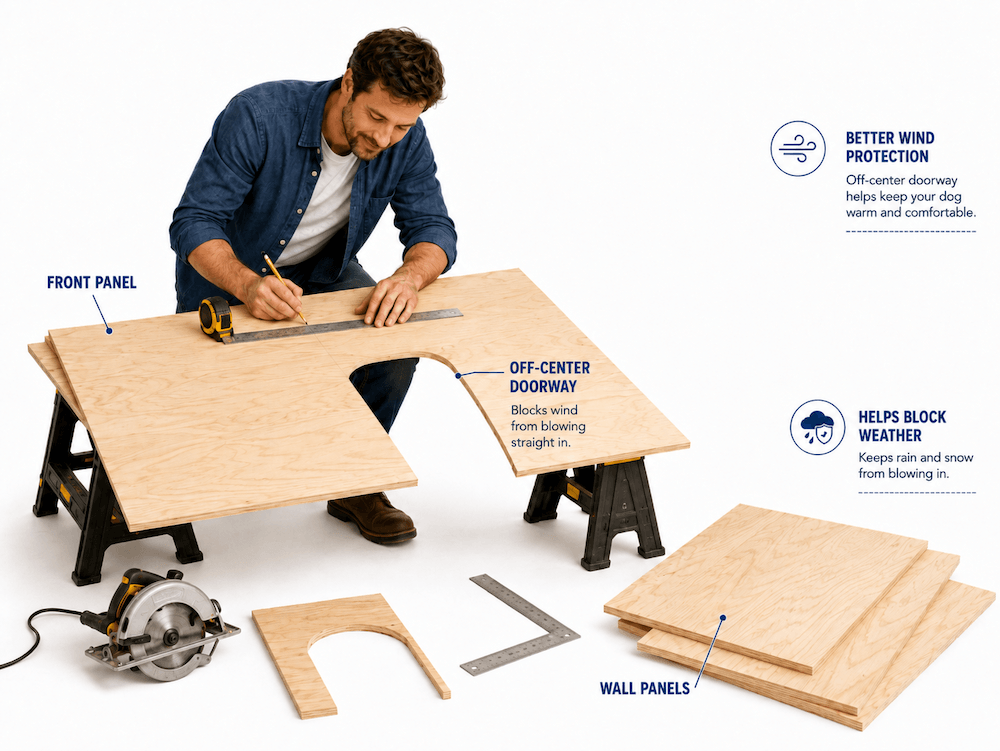
Step 4: Cut the Doorway and Wall Panels
Cut side, back, and front wall panels from exterior plywood. Place the doorway slightly off-center when possible so your dog can lie inside without resting directly in the wind path. The doorway should be large enough for easy entry but not so large that it lets in unnecessary rain, wind, or cold air.
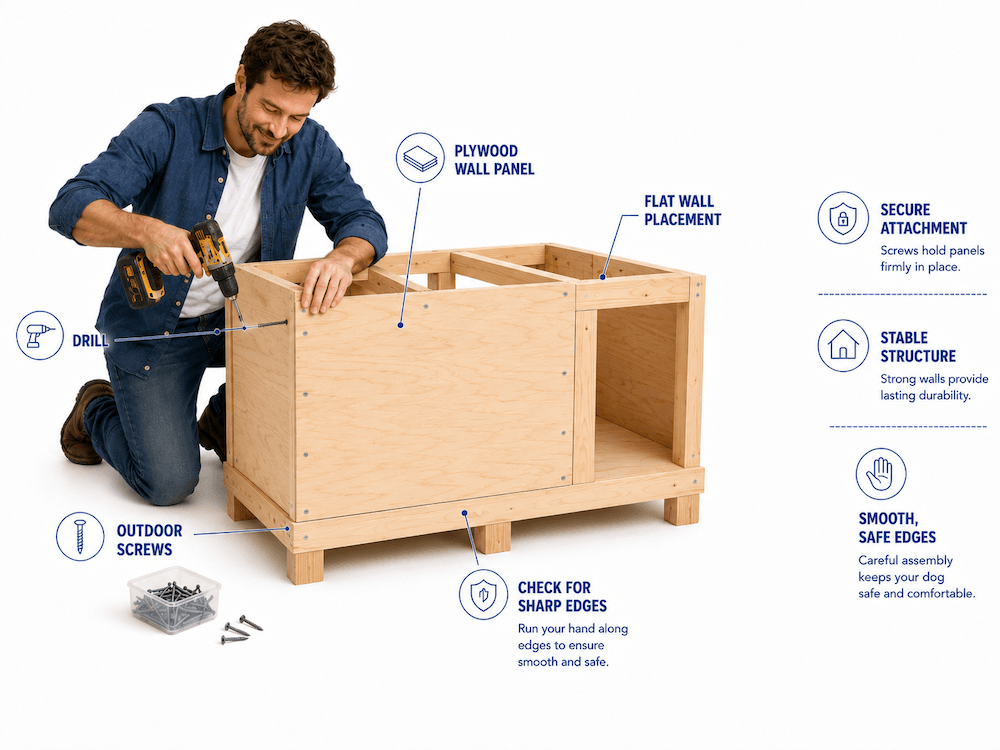
Step 5: Attach the Walls Securely
Fasten the plywood panels to the frame with outdoor screws. Check that each panel sits flat and that no screw tips, splinters, or rough edges point into the dog’s space. Once the walls are attached, gently push the structure from different sides to test stability. A dog house should not wobble, shift, or rack when your dog enters, exits, turns around, or leans against it.
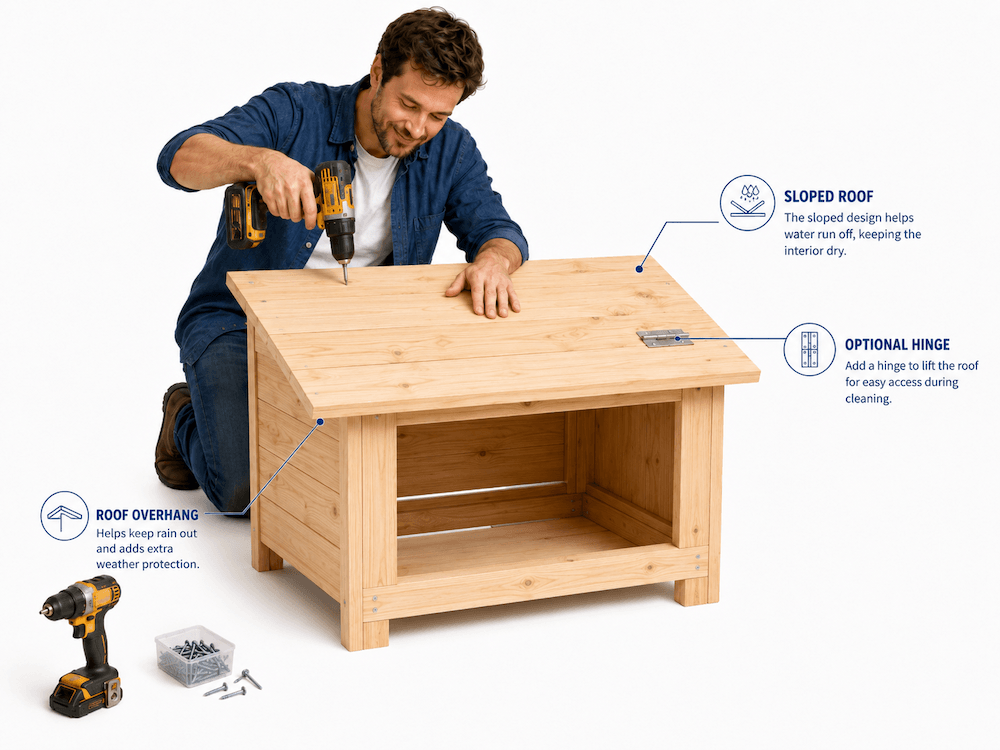
Step 6: Build a Sloped Roof
A sloped roof helps water run off instead of collecting on top. You can build a single-slope roof or a gable roof, but the roof should overhang the walls to reduce rain entry. A hinged roof is especially useful because it makes cleaning easier.
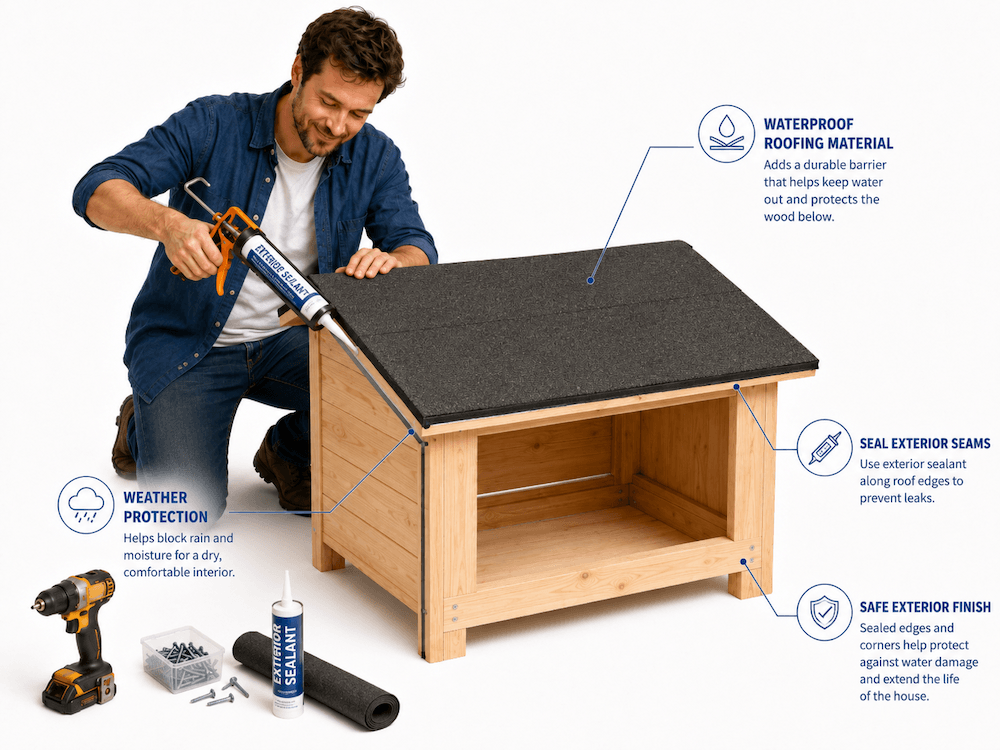
Step 7: Add Roofing Material and Weather Protection
Cover the roof with shingles, metal roofing, fiberglass sheets, or another waterproof roofing material. Make sure nails or screws do not poke through the interior ceiling. Seal exterior seams where water could enter, especially around roof edges, corners, and the base. Use a pet-safe exterior sealant or paint and let it fully cure before allowing your dog inside.
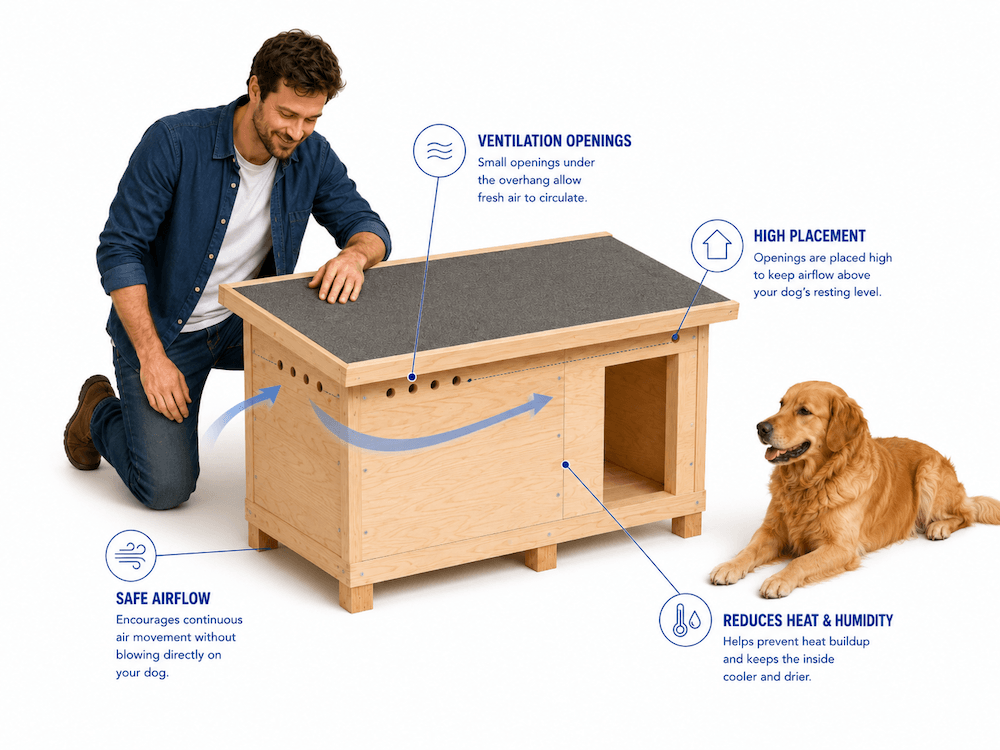
Step 8: Add Ventilation Without Creating Drafts
Ventilation helps reduce trapped heat, humidity, and stale air. Small vents under the roof overhang or high on the side walls are often better than low vents that blow directly onto your dog. This matters most in hot climates, humid regions, and for dogs at higher heat risk.
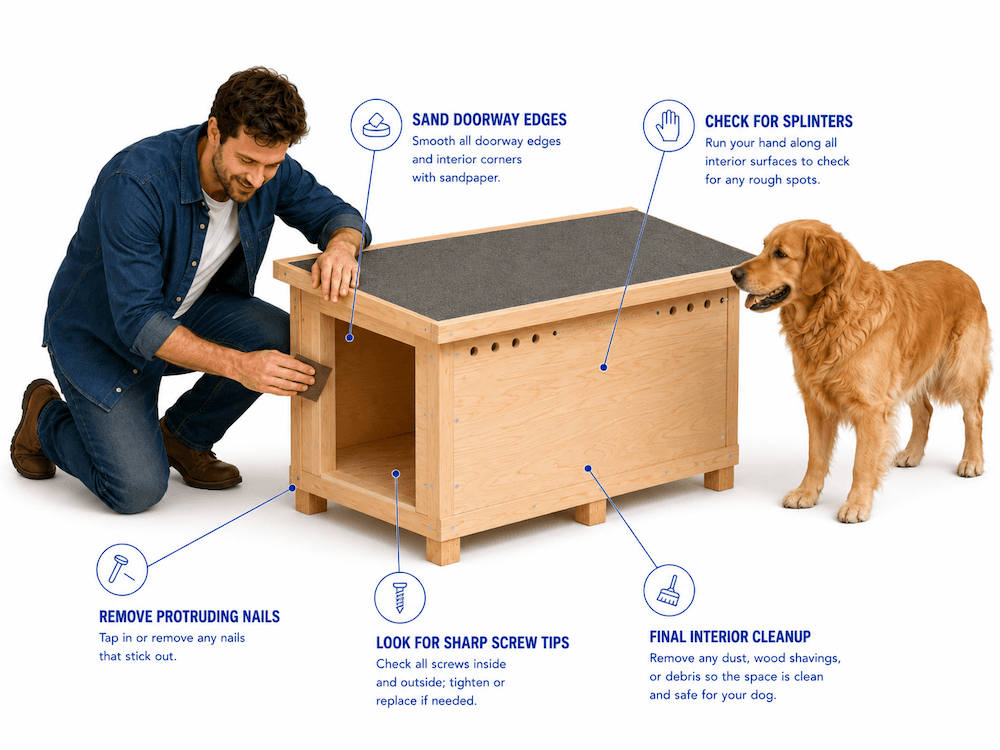
Step 9: Sand, Inspect, and Clean the Interior
Sand every cut edge, doorway edge, and interior corner. Run your hand along the inside walls, floor, and entrance to check for sharp points, splinters, nails, or screw tips. Before your dog uses it, sweep or vacuum out sawdust. Add dry bedding only after the structure is clean, cured, stable, and fully weatherproofed.
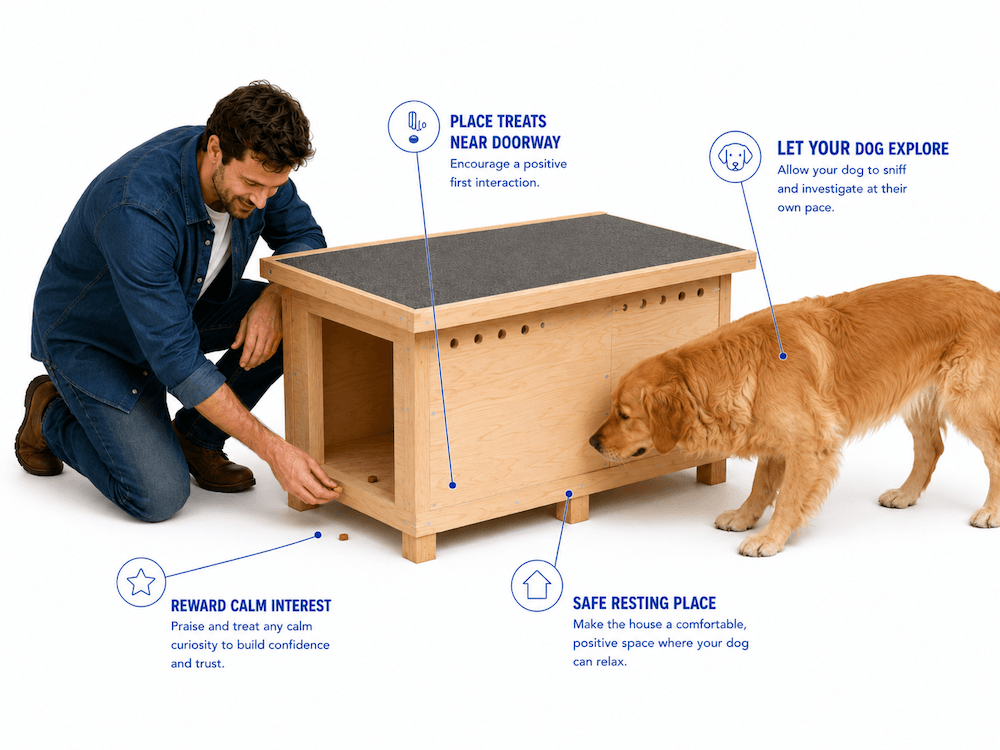
Step 10: Introduce Your Dog Slowly
Let your dog sniff the dog house before expecting them to use it. Place treats near the doorway, then inside the entrance, and allow your dog to explore without pressure. Never force or shut your dog inside to “teach” them to use it. A calm introduction helps the dog house feel like a safe resting spot instead of a trap.
Where to Find Free Printable Dog House Plans
Free printable dog house plans are available from home-improvement, woodworking, DIY, and animal-welfare websites. Choose a plan that includes clear measurements, a materials list, a cut list, roof details, ventilation, and guidance on adjusting the size for your dog.
Before using any free plan, resize it to your dog, check that the floor is raised, confirm the roof sheds water, and make sure the doorway, ventilation, and materials are safe for outdoor use.
| Website | Best For | Free Plan Link |
|---|---|---|
| Lowe’s | Beginner-friendly dog house plans with step-by-step instructions, scaling tips, and safety notes. | Visit Lowe’s dog house plan |
| Habitat for Humanity | Simple PDF doghouse plans using exterior-grade plywood and practical sizing guidance. | Open Habitat PDF plan |
| Construct101 | Large dog house plans with a free PDF, illustrated steps, measurements, and cut list. | Visit Construct101 plan |
| MyOutdoorPlans | Size-specific and weather-focused plans, including small, insulated, and porch-style dog houses. | Visit MyOutdoorPlans |
| Ana White | Printable woodworking-style dog house plans with project steps and community build examples. | Visit Ana White plan |
| The Spruce Pets | Roundup of free DIY dog house plans, including budget, insulated, and decorative designs. | Visit The Spruce Pets |
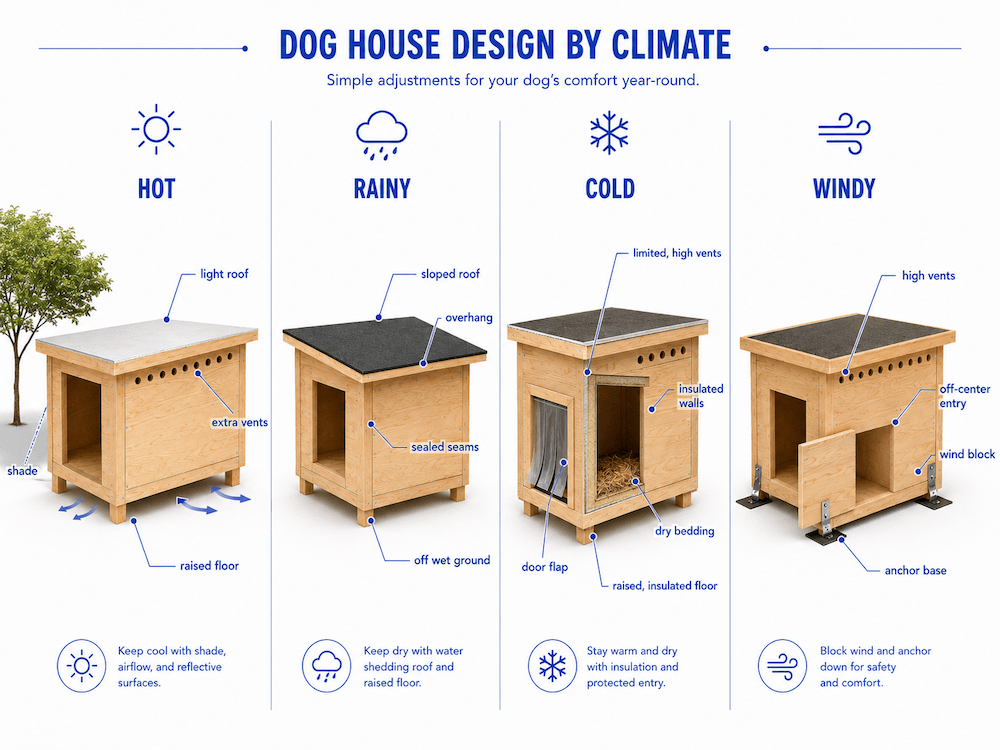
Dog House Design Options for Different Climates
A dog house in a hot, humid yard needs different priorities than one in a cold, windy yard. The basic structure is similar, but the details change.
In hot areas, prioritize shade, airflow, light-colored exterior finishes, and a roof that blocks direct sun. In cold areas, prioritize insulation, wind protection, dry bedding, and a doorway flap that does not trap moisture or block safe exit.
Helpful Tips for Building a Dog House That Lasts
Good dog house design is about comfort, safety, and maintenance. Small choices—like a hinged roof, raised base, and smooth doorway—can make the house easier to use and easier to clean.
| Tip | Why It Helps | How to Apply It |
|---|---|---|
| Raise the floor | It reduces dampness and improves airflow. | Use skids, legs, blocks, or a raised frame. |
| Use a sloped roof | It helps rain and debris slide off. | Add overhang beyond each wall edge. |
| Offset the door | It gives your dog a calmer wind-free corner. | Place the entrance closer to one side. |
| Add ventilation | It limits heat, humidity, and stale air. | Add small high vents under the roofline. |
| Smooth every edge | It helps prevent scrapes and paw injuries. | Sand the doorway, floor, and corners carefully. |
| Plan for cleaning | Clean shelters are safer and more comfortable. | Use a hinged roof or removable panel. |
How to Insulate a Dog House Without Making It Unsafe
Insulation can help in cold climates, but it must be protected from chewing, moisture, and loose edges. Alberta SPCA recommends insulation in the walls, roof, and floor to help retain body heat and protect against cold temperatures.
Use rigid foam panels or another suitable insulating material inside wall cavities, then cover it with plywood so your dog cannot reach it. Avoid loose insulation that can be pulled out, swallowed, or soaked with moisture.
For bedding, keep the climate in mind. Blankets or towels can absorb moisture and freeze in winter, while straw is often recommended for outdoor cold-weather shelter because it resists moisture better.
Mistakes That Can Make a Dog House Unsafe or Uncomfortable
Many dog house problems come from small design choices that seem harmless at first. A doorway that is too large, a floor placed directly on the ground, or a house sitting in full sun can quickly affect comfort.
| Mistake | Why It Is a Problem | Better Choice |
|---|---|---|
| Building too large | Oversized interiors lose warmth in cool weather. | Size it to your dog’s natural movement. |
| Skipping elevation | Ground contact increases dampness and chill. | Build a raised, supported floor frame. |
| Using sharp fasteners | Exposed points can scrape skin or paws. | Inspect every interior surface by hand. |
| Ignoring airflow | Trapped heat and humidity reduce comfort. | Add protected vents near the roofline. |
| Facing strong wind | Wind-driven rain can enter the doorway. | Turn the entrance away from prevailing wind. |
| Using wet bedding | Damp bedding can chill your dog. | Check bedding often and keep it dry. |
| Forcing use | Pressure can make dogs fear the house. | Introduce it slowly with praise and treats. |
What Veterinary Guidance Says About Dog House Safety
Veterinary and animal-welfare guidance consistently points to the same idea: a dog house must protect against weather while still allowing airflow, comfort, and safe movement. Texas A&M’s veterinary guidance highlights size, shade, airflow, material choice, elevation, and a slanted roof as practical features that improve outdoor shelter comfort and durability.[1]
Cold-weather guidance adds another layer. Alberta SPCA recommends insulation, correct sizing, weather protection, and dry bedding, while ASPCA warns that dogs should not be left outdoors in snowstorms, sleet, ice, wind, extreme cold, or other inclement weather.[2][3]
Heat guidance matters too. Cornell’s canine health resource lists early overheating signs such as heavy panting, shade-seeking, whining, reluctance to play, and drooling, and warns that difficulty breathing, vomiting, bloody diarrhea, weakness, confusion, seizures, or collapse require immediate veterinary care.[4]
Merck Veterinary Manual also emphasizes that prolonged cold exposure can be dangerous and that signs such as weakness, disorientation, shallow breathing, slow pulse, collapse, or unconsciousness need immediate veterinary attention. This supports a practical takeaway: a dog house should reduce weather risk, but it should not be treated as full protection from dangerous temperatures.[5]
What to Do After Building a Dog House
After the dog house is built, treat the first week as a test period. Watch whether rain enters, whether the interior stays dry, whether the floor feels stable, and whether your dog chooses to enter calmly.
Check the house during different weather conditions, not just on the day you finish it. The best sign of success is a dog who enters willingly, rests comfortably, and can leave freely without scraping, slipping, overheating, or becoming trapped.
When to Call a Veterinarian or Professional
Call a veterinarian if your dog shows signs of overheating, cold stress, injury, breathing difficulty, weakness, vomiting, collapse, seizures, confusion, or unusual behavior after outdoor time. These can be emergency signs and should not be treated as normal tiredness.
Call a professional builder or handyman if the dog house wobbles, the roof feels too heavy, the panels do not line up, or the frame is difficult to secure. The structure should be sturdy enough to withstand wind and rain without shifting, collapsing, or exposing your dog to sharp hardware.
Contact a trainer or behavior professional if your dog panics around the dog house, refuses to enter, or seems fearful despite gradual introduction. The goal is for the house to feel safe and comfortable, not forced.
Frequently Asked Questions
The Bottom Line
Building a dog house is about creating a safe, dry, and comfortable outdoor shelter that fits your dog’s size and your local climate. A good design starts with accurate measurements, a raised floor, sturdy walls, a sloped waterproof roof, and proper ventilation. Small details like smooth edges, pet-safe sealant, shaded placement, and easy cleaning access can make a big difference in how well the house works over time. Avoid making the house too large, poorly ventilated, or exposed to direct sun, wind, or standing water. Once it is finished, introduce your dog slowly with treats and praise so the space feels safe and positive. Remember that a dog house can provide useful outdoor shelter, but it should not replace indoor protection during extreme heat, cold, storms, or unsafe weather. With careful planning and regular maintenance, a DIY dog house can be a practical, long-lasting comfort space for your dog.