How to Clean a Dog’s Ears: 7 Vet-Approved At-Home Steps

Canine Bible is reader-supported. We receive affiliate commissions via some of our links. Learn more.
Cleaning a dog’s ears starts with a vet-approved ear cleaner, cotton balls or gauze, and a gentle wipe of the outer ear canal—never a cotton swab pushed inside. The goal is to remove debris and excess wax safely without irritating the ear or forcing material deeper. That said, not every dog needs frequent ear cleaning, and doing it too often can sometimes cause more harm than good. Dogs with floppy ears, allergies, frequent swimming, or a history of ear infections may need a different routine than dogs with naturally clean, healthy ears. It is also important to know the difference between normal earwax and warning signs like redness, odor, discharge, or pain. In this guide, we’ll cover how to clean your dog’s ears step by step, when to do it, what to avoid, and when it is time to call your vet
The Importance of Cleaning a Dog’s Ears
| Why It Matters | Key Impact |
|---|---|
| Prevents irritation | Cleaning the right way helps remove debris and buildup before they start bothering your dog’s ears. |
| Lowers infection risk | Safe ear cleaning can reduce moisture, wax, and dirt that may contribute to ear infections. |
| Avoids ear damage | Using the proper method helps protect the delicate ear canal from scratches, pain, and pushed-in debris. |
| Catches problems early | Regular checks during cleaning make it easier to notice redness, odor, swelling, or unusual discharge sooner. |
| Reduces discomfort | Keeping ears clean can help dogs feel more comfortable, especially if they are prone to wax or trapped moisture. |
| Saves money | Good ear care may help prevent minor buildup from turning into a vet visit or prescription treatment. |
| Makes handling easier | Gentle, routine cleaning can help your dog stay calmer and more cooperative during grooming and health checks. |
| Supports long-term health | Consistent ear care helps maintain healthier ears over time and lowers the chance of recurring issues. |
Before You Start Cleaning Your Dog’s Ears
Before you clean your dog’s ears, make sure this looks like a routine maintenance job and not a medical problem. Ear cleaning is most appropriate for mild wax, dirt, or moisture, especially in dogs with allergies, floppy ears, recurrent ear issues, frequent swimming, or a lot of hair at the ear opening; dogs with healthy ears may only need cleaning when you actually notice debris.
- Routine cleaning is usually enough when you see light wax, minor dirt, or damp ears after a bath or swim and the ear is otherwise comfortable.
- Check more often if your dog has drop ears, allergies, repeat infections, or lots of ear-opening hair, since those dogs are more prone to buildup and irritation.
- Stop and call your vet if you notice redness, swelling, bad odor, dark or pus-like discharge, or clear pain when the ear is touched.
- Get prompt veterinary help for head tilt, balance changes, severe scratching, or obvious distress, since those can point to a deeper ear problem.
- Do not overclean healthy ears, because cleaning too often can irritate the ear canal and make problems more likely.
Once the ear looks like a routine-cleaning case rather than an infection or injury, you can move on to the step-by-step process.
Dog Ear Cleaning: Breed and Ear Type Considerations
The table below summarizes breed-related ear-cleaning considerations from Cornell and VCA guidance plus VetCompass/RVC research showing higher otitis risk in poodle-type breeds, spaniel-type breeds, designer poodle mixes, and dogs with pendulous or V-shaped drop ears, while some erect-eared breeds showed lower relative risk overall.
| Breed or Ear Type | Why to Watch More Closely | Cleaning Consideration |
|---|---|---|
| Spaniels | Spaniel-type dogs showed higher ear infection risk overall. | Check weekly and clean when wax, odor, or moisture appears. |
| Poodles & Doodles | Poodle-type dogs had higher risk; ear-opening hair can trap debris. | Inspect often and keep excess ear-opening hair neatly trimmed. |
| Retrievers That Swim | Drop ears plus trapped water can encourage irritation and infection. | Dry ears after swimming and clean only if debris remains. |
| Basset-Type Drop Ears | Long pendulous ears are linked with higher otitis risk. | Prioritize regular checks, but avoid overcleaning healthy ears. |
| V-Shaped Drop Ears | These ears showed higher risk than erect ears in studies. | Use gentle maintenance cleaning only when buildup is visible. |
| Erect-Eared Breeds | Some erect-eared breeds showed lower relative risk overall. | Clean only as needed, not on an automatic schedule. |
Use this only as a screening guide, not a fixed schedule: even high-risk breeds do best with regular checks and as-needed cleaning, while any dog with pain, odor, or discharge should be seen by a vet.


How to Clean a Dog’s Ears Step by Step
Follow these steps to properly clean your dog’s ears.
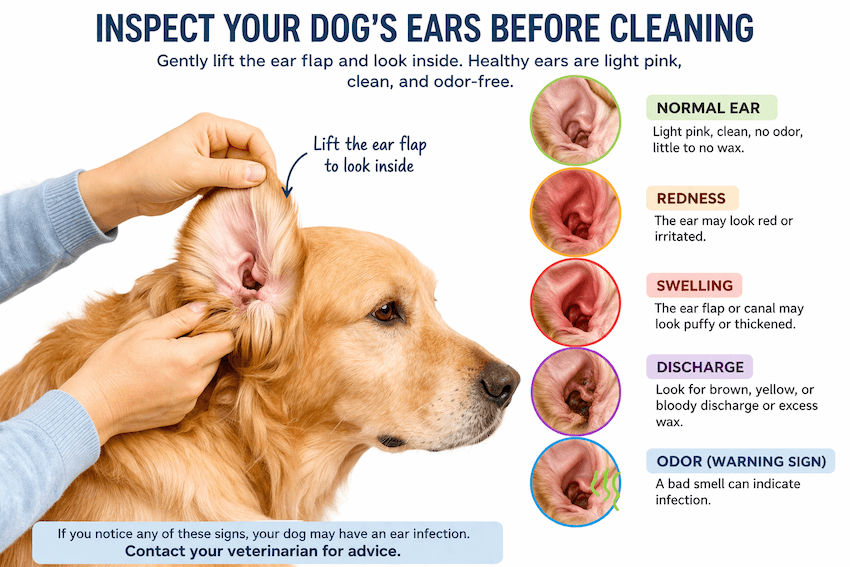
Step 1: Check the ear before you start.
Lift the ear flap and look for redness, swelling, discharge, a bad smell, or obvious pain. Routine home cleaning is for mild wax or debris, not for a sore or visibly inflamed ear.
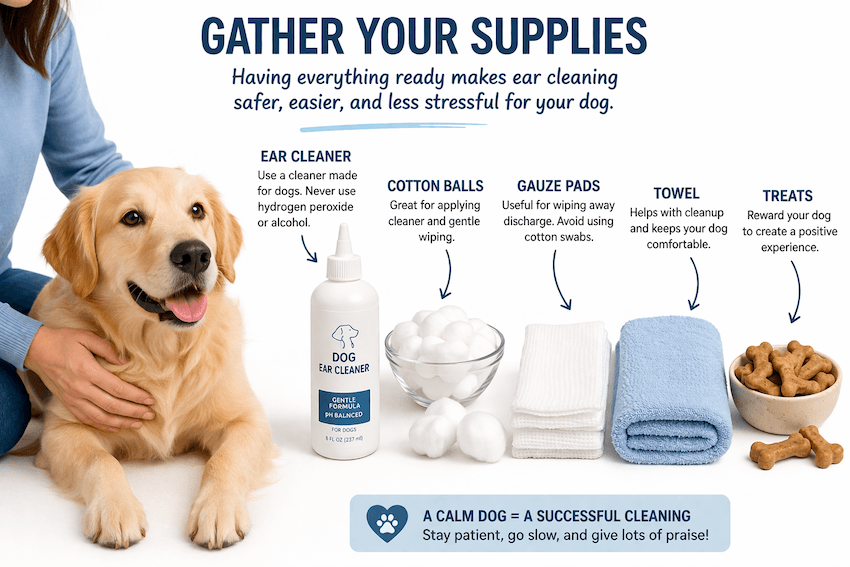
Step 2: Gather your supplies and position your dog calmly.
Use a veterinarian-approved ear cleaner, cotton balls or gauze, a towel, and treats. Put your dog in a stable position that matches its size, and keep the session calm and brief from the start.
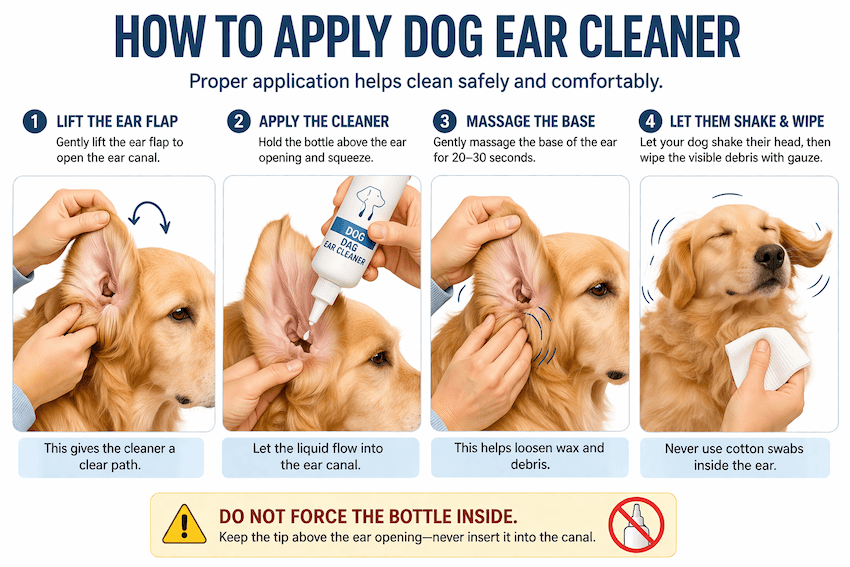
Step 3: Add the ear cleaner without forcing the bottle deep inside.
Pull the ear flap up to help straighten the canal, then squeeze enough cleaner into the ear canal to fill it. Do not jam the bottle tip into the ear, and stop if your dog reacts as if the ear is painful.


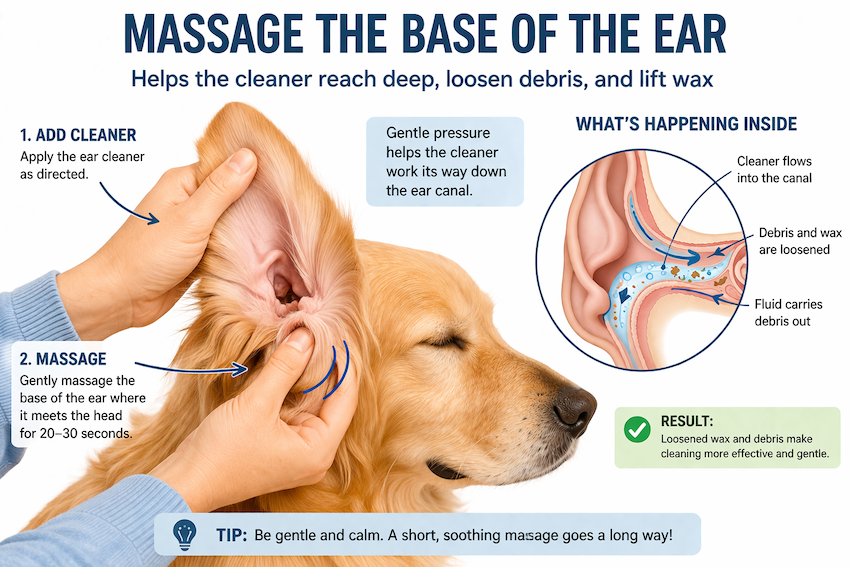
Step 4: Massage the base of the ear for about 20 to 30 seconds.
Gently massage the base of the ear until you hear the cleaner move around. This helps break up debris in the canal so it can move outward instead of making you dig for it.
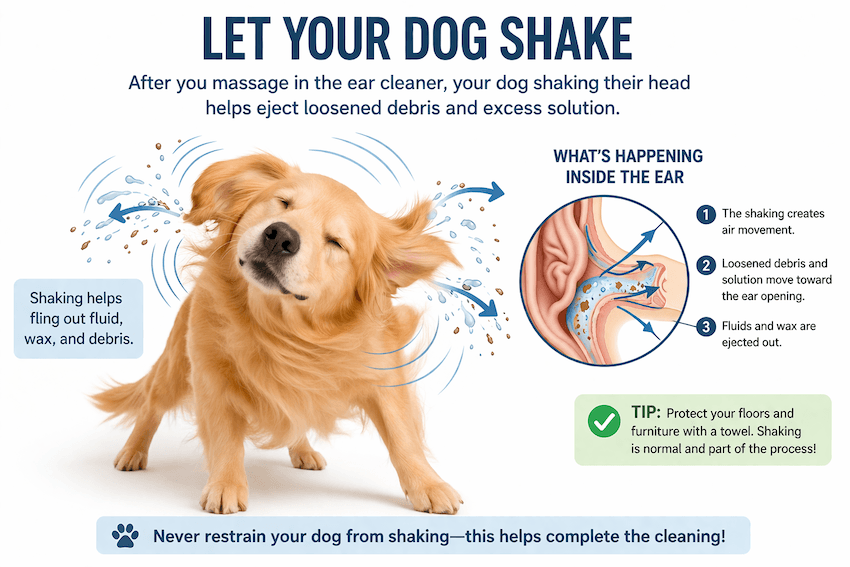
Step 5: Let your dog shake its head.
Once you stop massaging, allow your dog to shake. That shake helps move loosened cleaner and debris toward the outer opening where you can remove it more safely.
Step 6: Wipe away the debris with gauze or cotton.
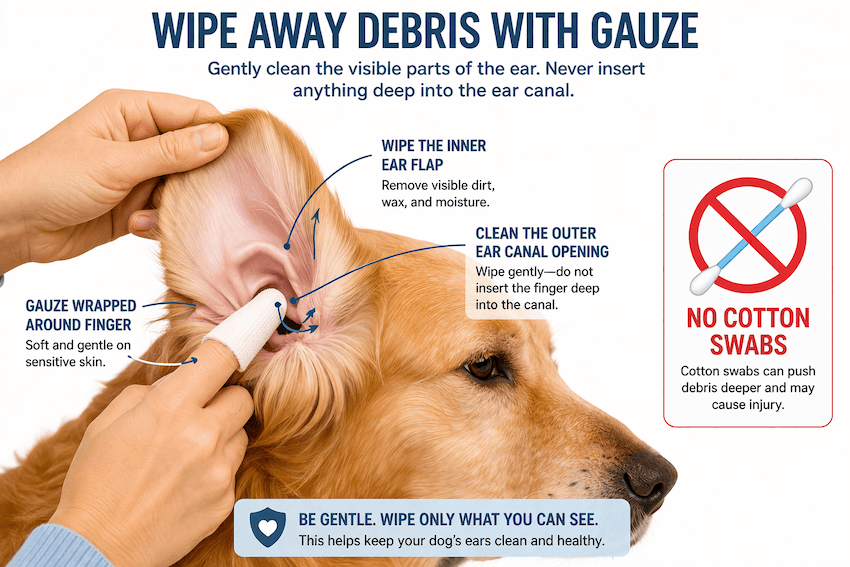
Use gauze or a cotton ball to wipe the inner ear flap and the canal opening only as far as your finger comfortably reaches. Do not use cotton swabs, because they can push debris deeper and may injure the ear canal or eardrum.
Step 7: Repeat only if needed, then reward your dog.
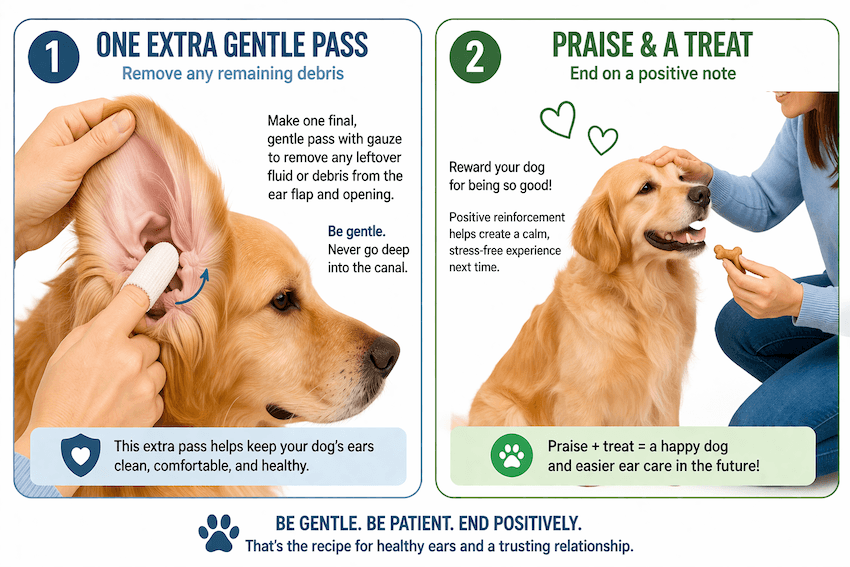
If the gauze comes away very dirty, you can repeat the cleaning, massaging, and wiping cycle once more. Finish with praise and treats, and if your dog has prescribed ear medication, ask your vet whether it should go in right after cleaning or after a short delay.
How to Make Ear Cleaning Easier Over Time
Ear cleaning usually gets easier when your dog learns that ear handling predicts something positive. Pair each step with rewards, such as treats, praise, or a calm break, so your dog builds a better association with the process. Start small by briefly touching the ear flap, then gradually work up to lifting the ear, adding cleaner, and wiping, instead of trying to do everything at once.
Short, low-stress sessions are often more effective than pushing through a long struggle. Practice when your dog is relaxed and the ears are not sore, since it is much harder to build cooperation once the ears are already painful or inflamed. The goal is to make dog ear cleaning feel familiar and manageable over time, not something your dog only experiences when something is wrong.
How Often Should You Clean Your Dog’s Ears?
How often you should clean your dog’s ears depends on the individual dog, not a fixed schedule. Some dogs with healthy ears may only need an occasional wipe when you notice wax, dirt, or moisture, while others may need more regular checks because of floppy ears, allergies, frequent swimming, or a history of buildup. Cleaning too often can irritate the ear canal, so more is not always better.
If your dog has recurring ear issues, follow your veterinarian’s guidance instead of guessing. Dogs with repeated infections, chronic inflammation, or underlying skin and allergy problems often need a more specific routine, including the right cleaner and the right frequency. In those cases, regular ear checks are helpful, but the best cleaning plan is the one based on your dog’s medical history.
When to Call the Vet About Your Dog’s Ears
If your dog has repeated ear infections, clear pain, dark discharge linked to ear mites, a bad odor, or symptoms like head tilt and balance problems, stop home cleaning and call your vet. Veterinary guidance treats these as warning signs that may point to infection, deeper ear involvement, inflammation, or another issue that needs diagnosis rather than routine maintenance at home.
The table below summarizes the main red flags and why they matter.
| Warning Sign | Why It Matters | What to Do |
|---|---|---|
| Repeated infections | Repeat flare-ups often mean an underlying issue needs treatment. | Book a vet exam instead of relying on routine cleaning. |
| Pain | Pain can signal infection, inflammation, or possible eardrum damage. | Stop cleaning and have the ear checked promptly. |
| Dark discharge | Dark debris can point to infection, mites, or severe buildup. | Let your vet examine the ear before cleaning further. |
| Bad odor | A strong smell often suggests yeast, bacteria, or active inflammation. | Schedule a vet visit rather than masking it with cleaner. |
| Balance issues | Balance changes may mean the middle or inner ear is involved. | Seek veterinary care as soon as possible. |
| Head tilt | Head tilt can be a sign of deeper ear disease. | Treat it as urgent and contact your veterinarian. |
Pain, odor, discharge, and repeated infections are common otitis warning signs, while head tilt and balance changes raise concern for middle or inner ear involvement, which is why those signs should not be treated as a simple home-cleaning issue.
What Research Says About Cleaning a Dog’s Ears Safely
Veterinary guidance from Cornell and VCA agrees on the core technique: use a dog-safe cleaner, massage the base of the ear, let the dog shake, and wipe only the parts you can safely reach with gauze or cotton. Those same sources also stress that overcleaning and deep probing can irritate the ear canal rather than help it.
A veterinary dermatology review by Nuttall and Cole concluded that ear cleaning helps maintain a normal ear environment and is important in otitis management, but overcleaning can trigger problems through maceration of the ear lining. Clinically, that means cleaning has value, but more is not always better.[1]
A 2024 study on canine otitis externa found that dogs improved whether ears were cleaned or not, although cleaning appeared more useful when rod-shaped bacteria were present. That matters because it suggests routine cleaning can support treatment in some cases, but it does not replace a diagnosis when the ear is infected or very painful.[2]
An AVMA Journals review on recurrent otitis externa also notes that treatment usually needs to be tailored to the individual dog and typically includes ear cleaning plus anti-inflammatory and antimicrobial therapy when indicated. In other words, cleaning is often one part of care, not the whole solution when ear disease keeps coming back.[3]
Additional Tips for Cleaning a Dog’s Ears
These tips are based on common veterinary handling and ear-cleaning guidance and are meant to make the process calmer, gentler, and easier to repeat.
| Tip | Why It Helps | How to Apply It |
|---|---|---|
| Use treats often | Rewards help your dog stay calmer during ear handling. | Give one after each calm step during cleaning. |
| Keep sessions short | Short sessions prevent stress from building too quickly. | Stop after one calm pass when the ear looks clean. |
| Use gauze, not swabs | Gauze removes debris without pushing it deeper. | Wrap it around your finger and wipe gently. |
| Check ears after swimming | Moisture can worsen buildup in dogs prone to ear issues. | Inspect the ears after baths, swims, or rain. |
| Warm the cleaner slightly | Cold liquid can feel startling inside the ear canal. | Hold the bottle in your hands for a minute. |
| Compare both ears | One ear may look normal while the other needs attention. | Check color, odor, wax, and sensitivity on both sides. |
Common Mistakes When Cleaning a Dog’s Ears
These are the mistakes most likely to irritate the ear canal, push debris deeper, or delay treatment for a real ear problem.
| Mistake | Why It’s a Problem |
|---|---|
| Using cotton swabs | They push debris deeper; use gauze on your finger instead. |
| Cleaning a painful ear | Pain suggests disease; stop and have your vet examine it. |
| Using alcohol or peroxide | These can sting irritated tissue; use a dog-safe cleaner. |
| Overcleaning healthy ears | Too much cleaning can irritate the canal and trigger problems. |
| Scrubbing too deeply | Deep probing may injure the canal or eardrum. |
| Ignoring odor or discharge | Those signs may mean infection, not routine maintenance. |
After You Clean a Dog’s Ears
After cleaning, let the ear dry naturally and watch your dog for a return to normal comfort. Good signs include less head shaking, a cleaner ear opening, and no strong odor or visible discharge over the next day or two.
For maintenance, recheck the ears regularly rather than cleaning on a rigid schedule. Cornell notes that healthy ears may only need cleaning when dirt or debris is present, while dogs with floppy ears, allergies, recurrent ear issues, or frequent water exposure may need more frequent care.
Monitor more closely and call your vet if redness, swelling, odor, discharge, repeated scratching, head tilt, balance changes, or pain show up after cleaning. Recurrent ear disease often has an underlying cause, so repeated flare-ups usually need more than home cleaning alone.
Frequently Asked Questions
The Bottom Line
Cleaning a dog’s ears the right way is less about scrubbing often and more about using a gentle, safe technique when your dog actually needs it. For many dogs, a vet-approved cleaner, a calm approach, and a simple wipe of loosened debris are enough to keep the ears healthy. The most important part is knowing when routine cleaning is appropriate and when signs like odor, redness, discharge, or pain point to a problem instead. Dogs with floppy ears, allergies, frequent swimming, or a history of ear issues may need closer monitoring than others. Staying consistent with ear checks can help you catch buildup early and make cleanings easier over time. And when something looks unusual or your dog seems uncomfortable, it is always better to stop and ask your vet than risk making the ear worse.