How to Cut Dog Nails: 8 Easy at-Home Steps to Trim Properly

Canine Bible is reader-supported. We receive affiliate commissions via some of our links. Learn more.
To cut a dog’s nails safely, use proper dog nail clippers or a grinder and trim small amounts at a time, avoiding the quick—the sensitive inner part of the nail that can bleed. If you’re unsure where the quick is, make gradual cuts and stop when you see a darker center. The process is simple in theory, but it can feel intimidating in practice—especially with dark nails or a nervous dog. Many owners worry about causing pain, making the dog fearful, or cutting too short. Nail shape, size, and growth rate can also vary widely depending on the dog. Some dogs tolerate trims easily, while others need training or desensitization first. Different tools, techniques, and positions can make the process easier and safer. Understanding these details is what turns a stressful task into a routine part of your dog’s care.
Why Cutting Dog Nails Matters
| Why It Matters | Explanation |
|---|---|
| Prevents pain | Overgrown nails can press into the ground and make walking uncomfortable for your dog. |
| Supports healthy movement | Proper nail length helps your dog walk, run, and stand more naturally. |
| Reduces injury risk | Shorter nails are less likely to snag, split, or break during daily activity. |
| Protects paws and joints | Long nails can change foot placement over time and put extra strain on the legs and joints. |
| Makes handling easier | Regular trims help dogs get used to paw handling, which can make grooming less stressful. |
| Saves money | Learning to trim nails at home can reduce the need for frequent grooming or vet visits. |
| Improves home comfort | Trimmed nails are less likely to scratch floors, furniture, or people during normal movement. |
| Builds owner confidence | Knowing how to cut your dog’s nails safely makes routine care feel more manageable. |
Precautions Before Cutting Your Dog’s Nails at Home
For many dogs, nail cutting at home can be less stressful than going to a clinic or grooming appointment, especially when the process is introduced slowly and paired with practice, patience, and rewards. Over time, short, positive sessions can help some dogs become more comfortable with paw handling and make nail care feel more routine.
That said, owners should still think through a few important precautions before doing it themselves. If your dog has arthritis or joint pain, holding the paw in position may be uncomfortable or even painful. The same is true for dogs with brittle, split, or damaged nails, or for those with medical conditions affecting the nails or skin, since trimming may worsen irritation or cause discomfort. In these situations, veterinary guidance is often the safer choice, not because home nail cutting is impossible, but because a professional can help you avoid making a painful or stressful situation worse. If your dog seems comfortable enough for home care, the next step is to make the process as calm, safe, and manageable as possible.
How to Cut Dog Nails Step by Step
Follow this step-by-step guide for perfectly trimming your dog’s nails.
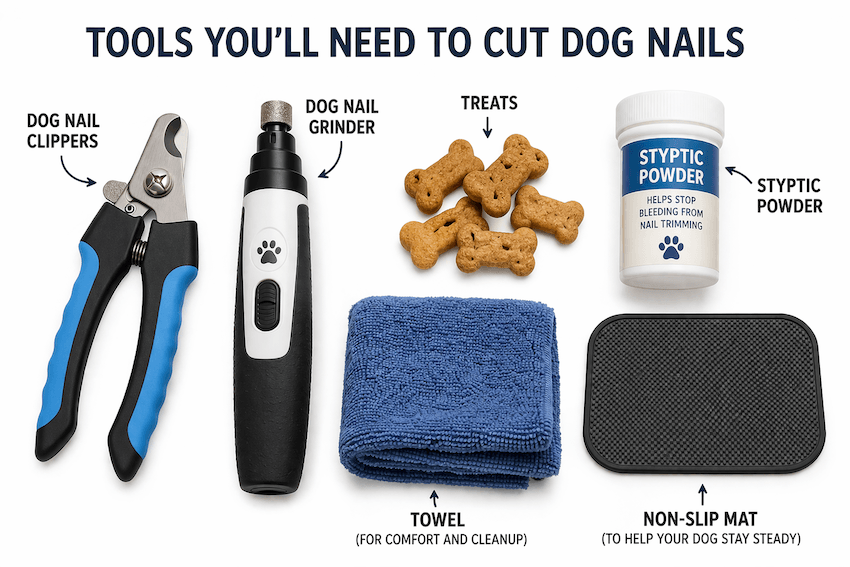
Step 1: Gather the Right Tools Before You Start
Use dog nail clippers or dog nail grinders, have treats ready, and keep styptic powder, cornstarch, or flour nearby in case you nick the quick. A non-slip mat and good lighting also make the trim safer and easier.


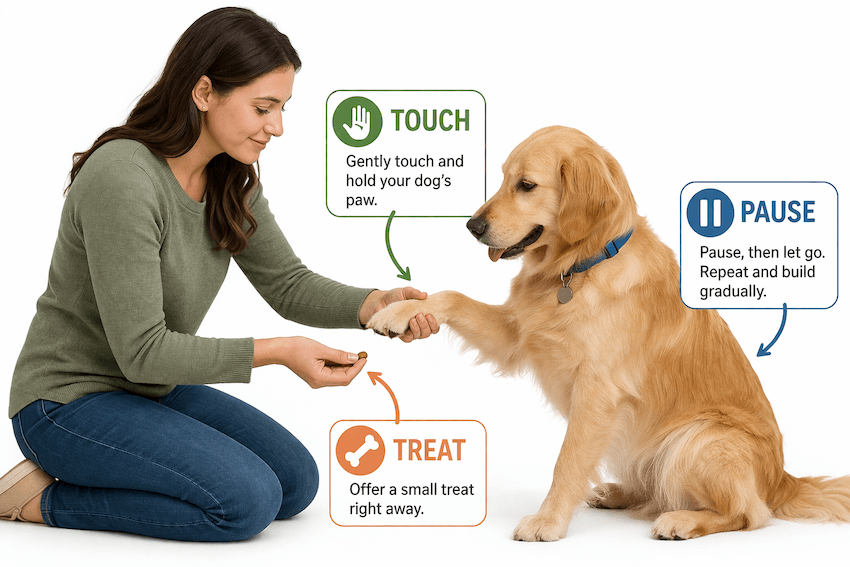
Step 2: Help Your Dog Settle Before Touching the Paws
Start in a quiet area where your dog feels relaxed. Touch the shoulder, move down the leg, and briefly touch the paw while pairing each step with a treat so your dog starts to associate handling with something positive. Dogs that show anxiety often do better with short, gradual sessions instead of one full trim.
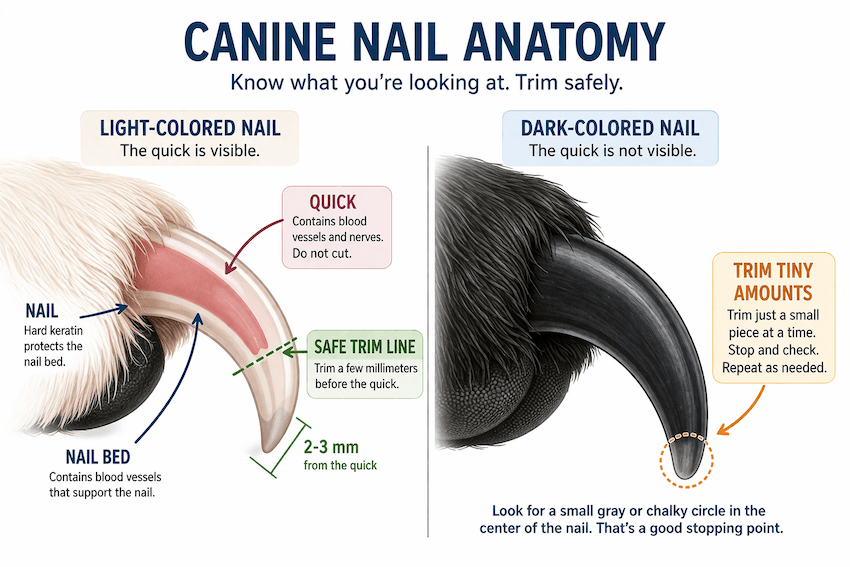
Step 3: Look at the Nail and Find a Safe Cutting Zone
If the nails are light-colored, look for the pink quick and plan to cut a few millimeters before it. If the nails are black, trim only the very tip at first and work in tiny amounts, because the quick is harder to see. Nails that touch the floor or click loudly on hard surfaces are usually too long.
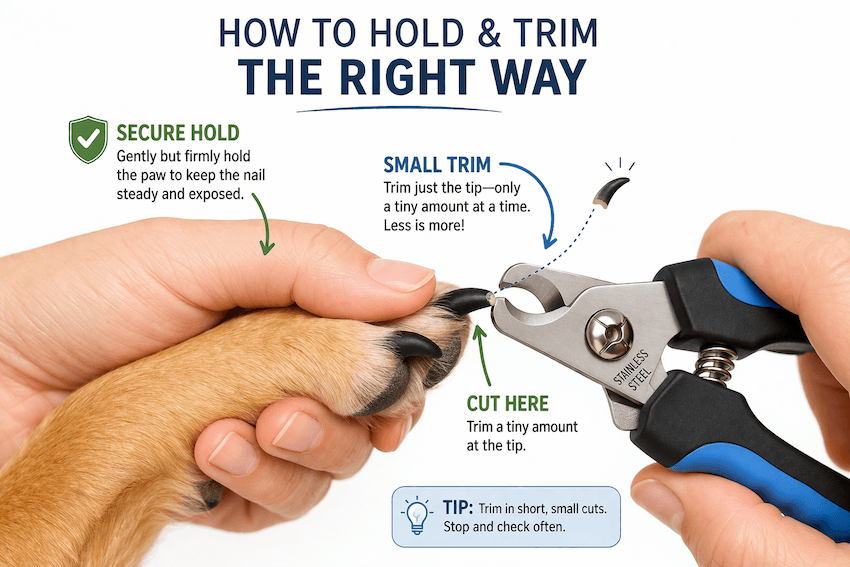
Step 4: Hold the Paw Steadily and Trim a Small Amount
Hold the paw gently but securely, then clip or grind off just a small amount of nail. With clippers, make a series of tiny trims instead of one large cut; with a grinder, use short passes so you do not overheat the nail.
Step 5: Stop as Soon as You Get Close to the Quick
On dark nails, the center may start to look darker or more moist as you get closer to the quick. Stop before that point rather than trying to make the nail perfect in one session. Several safe trims over time are better than one aggressive trim that causes pain or fear.

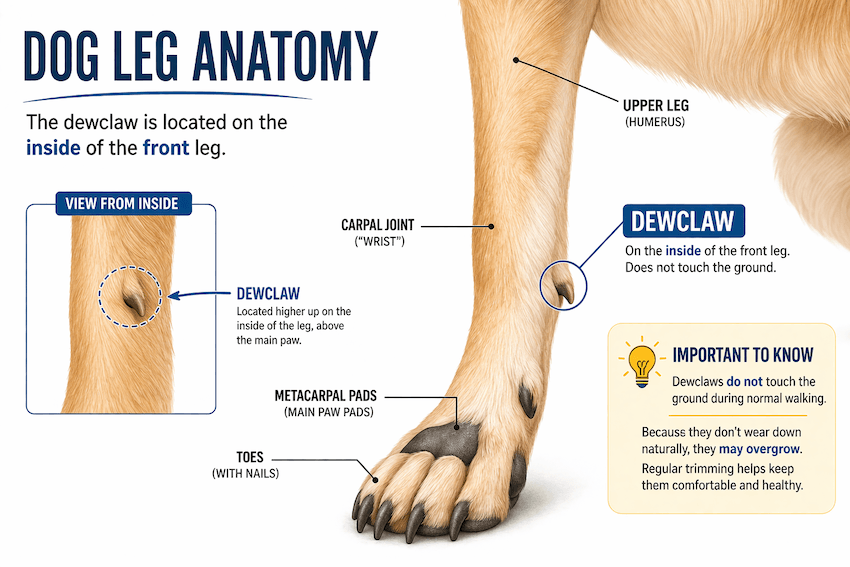
Step 6: Do Not Forget the Dewclaws
Check the dewclaws on the inside of the front legs, and sometimes the back legs if present. Because dewclaws do not wear down against the ground, they can overgrow and even curve into the skin if neglected.
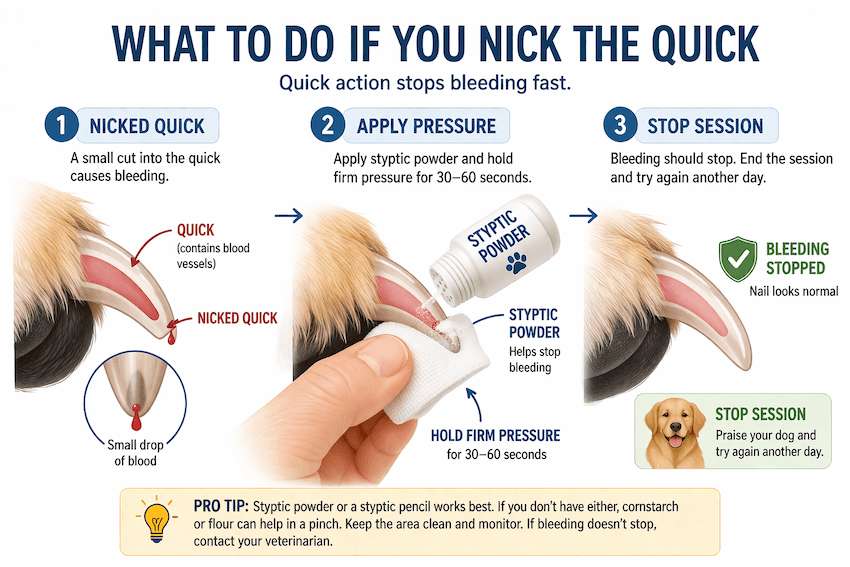
Step 7: If You Nick the Quick, Stay Calm and Stop the Bleeding
If the nail bleeds, apply styptic powder, cornstarch, or flour with gentle pressure. Once the bleeding stops, end the session on a calm note and reward your dog, especially if they are becoming stressed.
Step 8: End Early if Your Dog Is Struggling
You do not need to finish every nail in one sitting. Many dogs do better when owners trim one or two nails, reward generously, and continue later rather than pushing through a stressful session.
How Often Should You Cut Your Dog’s Nails?
How often you need to cut your dog’s nails depends largely on how quickly they wear down naturally. Dogs that walk frequently on hard surfaces like pavement may wear their nails down on their own, while indoor or less active dogs usually need more regular trims.
A simple rule is to watch and listen. If you hear your dog’s nails clicking on hard floors or see them touching the ground when standing, they are likely too long. Ideally, the nails should not make contact with the floor during normal standing or walking.
Frequent, small trims are often easier and safer than waiting too long and cutting a large amount at once. Regular trimming helps the quick gradually recede, which allows you to maintain shorter, healthier nail length over time. It also reduces stress for both you and your dog, since shorter sessions are typically more manageable and less intimidating.
When to Call a Groomer or Vet for Nail Cutting
While many owners can trim their dog’s nails at home, there are situations where professional help is the safer and better option.
If your dog shows severe fear—such as trembling, panicking, or trying to escape—it may be best to work with a professional who can handle the situation safely and may recommend behavior training strategies. Dogs that show aggression, including growling, snapping, or biting, should always be handled by experienced professionals to prevent injury.
Extremely overgrown nails are another reason to seek help, especially if the quick has grown out significantly or the nails are starting to curve. Dewclaws that curl inward toward the skin can become painful or even embed, requiring careful trimming or medical attention.
You should also consult a veterinarian if your dog has medical issues that affect handling, such as joint pain, injuries, infections, or sensitivity in the paws. In these cases, nail trimming may need to be done with additional care, restraint techniques, or even mild sedation to ensure your dog’s comfort and safety.
Evidence Behind How to Cut Dog Nails Safely
Veterinary guidance consistently emphasizes trimming small amounts and staying a few millimeters away from the quick, especially because cutting into the quick is painful and causes bleeding. Merck and VCA both describe the quick as the structure to avoid, and VCA advises tiny repeated cuts rather than one deep cut, which is one of the safest practical methods for home nail care.
Behavior matters just as much as technique. VCA’s behavior guidance notes that forcing nail trims, rushing, or tricking a fearful dog can worsen fear and damage trust, while gradual desensitization and pairing paw handling with rewards helps dogs participate more comfortably. That fits broader veterinary behavior thinking that pain- or fear-based handling can worsen anxiety and aggression, and that cooperative care improves welfare by giving animals more predictability and control.
There is also evidence that grooming access and owner instruction matter. A Frontiers in Veterinary Science study on community pet grooming found that routine grooming is important for health and well-being, and that a tailored nail-trimming demonstration improved owner confidence. Clinically, that matters because many owners avoid nail trims out of fear, not because the task is impossible.[1]
Extra Tips for How to Cut Dog Nails
| Tip | Why It Helps | How to Apply It |
|---|---|---|
| Use bright lighting | Better visibility lowers the chance of trimming too deep. | Work near a window or use a focused lamp. |
| Trim after exercise | A calmer dog usually stands more still. | Try the session after a walk or playtime. |
| Reward every paw touch | Frequent rewards build a positive handling association. | Give tiny treats during each brief paw interaction. |
| Start with one nail | Small wins reduce pressure on you and your dog. | Clip one nail, reward, and stop if needed. |
| Check nail angle | Proper angle helps remove less nail at once. | Trim small bits from the tip, not deep upward. |
| Keep styptic nearby | Quick access makes small accidents easier to manage. | Place it beside your tools before starting. |
| Track trim frequency | Regular trims help the quick recede gradually. | Set a reminder and check nail length often. |
Common Mistakes When You Cut Dog Nails
| Mistake | Why It’s a Problem |
|---|---|
| Cutting too much | Large cuts make quick injuries more likely. |
| Rushing the session | Speed often increases stress, movement, and trimming errors. |
| Ignoring body language | Fear signals usually mean your dog needs a slower pace. |
| Using dull tools | Dull blades can crush instead of cleanly cut. |
| Forgetting dewclaws | Dewclaws can overgrow because they wear down less. |
| Forcing restraint | Forced handling can worsen fear and future resistance. |
| Chasing perfect length | Over-trimming in one session raises the risk of pain. |
After You Cut Dog Nails
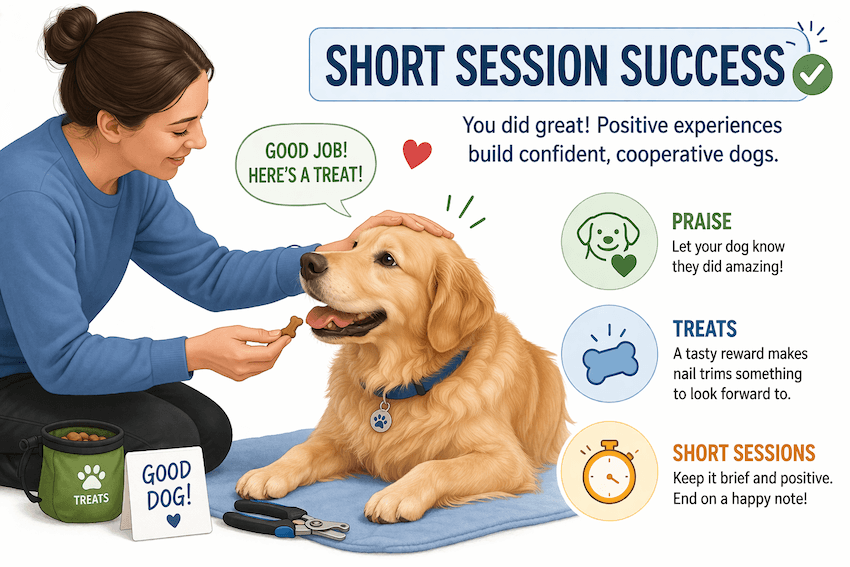
After trimming, let your dog walk normally on a flat surface and watch for signs of comfort, such as relaxed posture, normal stepping, and no persistent licking of the paws. Offer praise, treats, and a short break so the session ends with a positive association.
Going forward, check the nails regularly rather than waiting until they are obviously long. VCA notes that many dogs need trims about once a month, although dogs who walk often on rough surfaces may need less frequent trims, while less active dogs may need them sooner.
Monitor more closely or contact a veterinarian or groomer if your dog has repeated bleeding, limping, cracked nails, swelling, pain with paw handling, or intense panic during trims. If your dog cannot safely tolerate the process at home, professional help is the safer choice.
Frequently Asked Questions
The Bottom Line
Cutting your dog’s nails doesn’t have to be stressful—you just need the right tools, a calm approach, and a focus on trimming small amounts safely. When done correctly, it becomes a quick, routine part of your dog’s care rather than something to avoid. The key is consistency, patience, and knowing when to stop instead of trying to get perfect results in one session. Every dog is different, so your approach may need to adjust based on their comfort level, nail type, and behavior. Over time, regular trims help maintain healthy nail length and make the process easier for both of you. And if it ever feels overwhelming, there’s no downside to getting help from a groomer or veterinarian.