
How to Put a Prong Collar on a Dog: 7 Easy Trainer-Approved Steps


Canine Bible is reader-supported. We receive affiliate commissions via some of our links. Learn more.
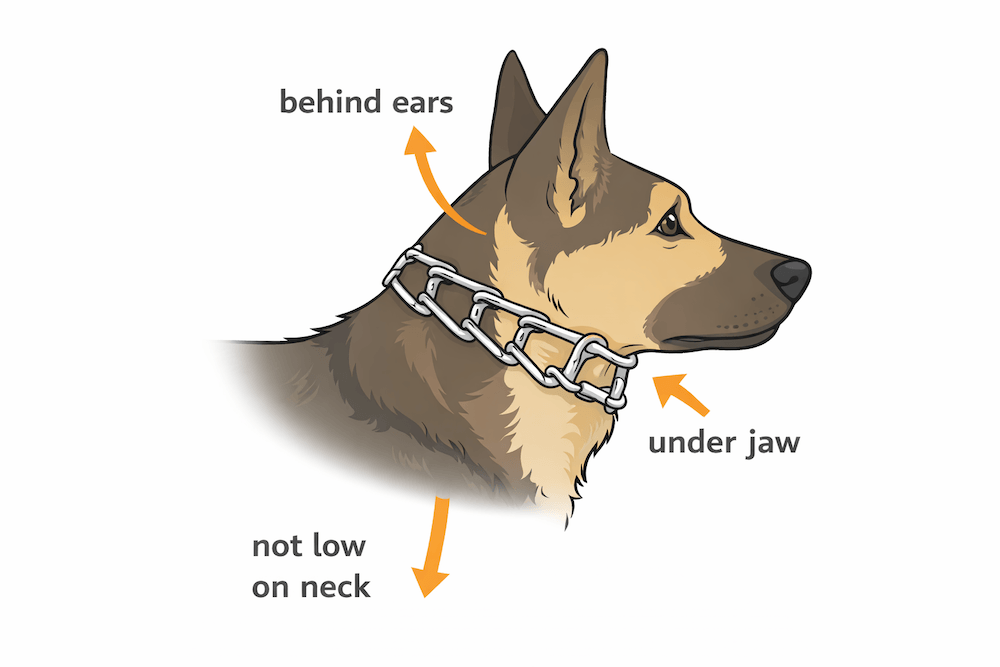
A prong collar should be placed high on your dog’s neck, just behind the ears and under the jaw, with a snug fit that does not slide down. It should be added and removed by unhooking a link, not by slipping it over the dog’s head. When fitted correctly, a prong collar stays in position and works more consistently. When fitted incorrectly, it can shift, pinch unevenly, or send mixed signals to your dog. Many owners also confuse proper sizing, leash placement, and how tight the collar should be. Others assume all dogs should wear one the same way, even though neck shape, coat type, and behavior can change the fit. This guide explains how to put it on correctly, what mistakes to avoid, and how to tell whether it is sitting where it should.
Prong Collar Safety Rules First
| Safety Rule | Why It Matters |
|---|---|
| Use the right fit | A prong collar should sit snugly high on the neck so it does not slide, twist, or pinch unevenly. |
| Place it high | Positioning it just behind the ears gives better control and reduces pressure on the lower neck. |
| Never leave it on | Prong collars should be removed after walks or training to lower the risk of snagging or injury. |
| Check for skin irritation | Regularly inspecting the neck helps catch rubbing, soreness, or pressure marks early. |
| Use gentle leash pressure | Light, controlled handling helps prevent fear, pain, and confusing corrections. |
| Do not use it on puppies | Young dogs usually need foundation training first because their bodies and behavior are still developing. |
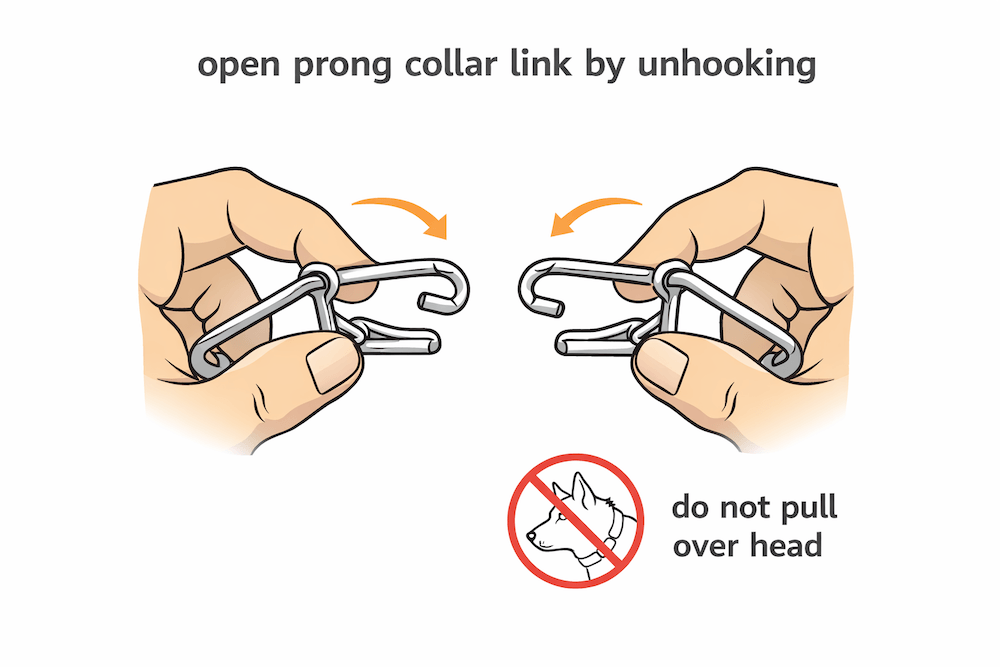
| Attach and remove it properly | Unhooking a link instead of pulling it over the head helps maintain the collar’s fit and function. |
| Pair it with training | A prong collar should support clear training, not replace teaching your dog what to do. |
What a Prong Collar Is and When Trainers Use It on a Dog
A prong collar is a metal training collar made of interlocking links that tighten evenly around the neck when leash pressure is applied. Some trainers use it as a pressure-and-release tool for dogs that pull hard on a leash or are difficult to control physically, but veterinary behavior organizations classify prong collars as aversive tools and recommend reward-based methods instead.
In practice, owners asking how to put a prong collar on a dog are usually trying to solve one of three problems: constant pulling, poor responsiveness on walks, or inconsistent collar placement. The fitting process itself is simple, but getting the height, snugness, and link count right is what determines whether the collar stays stable or shifts into a poor position.
When Not to Use a Prong Collar on a Dog
Do not use a prong collar on puppies, dogs with neck or airway issues, or dogs showing fear, panic, or aggression without guidance from a qualified behavior professional. Aversive tools can add stress, worsen emotional conflict, and fail to address the underlying cause of the behavior.
It is also a poor choice when the real issue is loose-leash skills, overarousal, reactivity, or handler timing. Evidence reviews and veterinary behavior guidance consistently favor reward-based dog training because aversive methods are not shown to be necessary and may carry welfare risks.


How to Choose the Right Prong Collar Size for a Dog
Choose a collar with link size appropriate for your dog’s build, then size it by adding or removing links until it sits high and snug on the neck. The correct fit is secure enough to stay in place behind the ears, but not so tight that it creates constant pressure when the leash is loose.
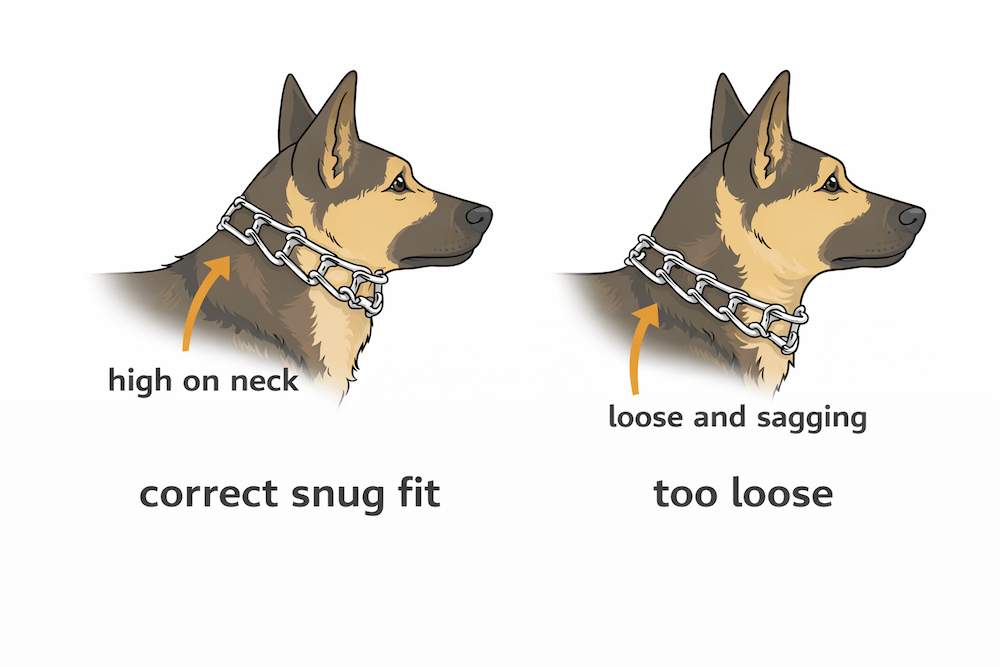
A collar that is too loose will slide down and twist. A collar that is too tight can create unnecessary pressure points and make the dog uncomfortable. The goal is not “as tight as possible.” The goal is a snug, stable fit that releases when leash tension stops.
How to Put a Prong Collar on a Dog: Step by Step
Here are the steps to safely put on a prong collar.
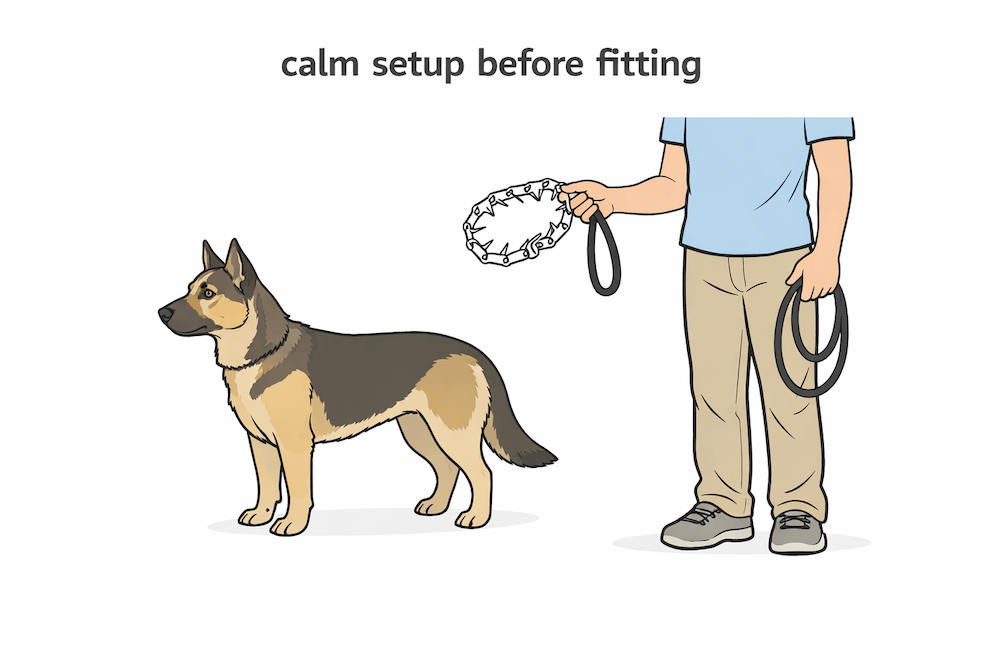
Step 1: Gather the Collar and Calm Your Dog
Have the prong collar ready before you approach your dog. Stand beside your dog in a calm space and wait until the dog is still, rather than trying to fit it during excitement.


Step 2: Identify the Opening Link
Locate one of the collar links designed to unfasten. A prong collar should be opened by separating a link, not by stretching it over the dog’s head.
Step 3: Place the Collar High on the Neck
Position the collar high on the neck, directly behind the ears, and under the jawline. This is the placement that keeps it from sliding down onto the lower neck.
Step 4: Reconnect the Link and Check the Fit
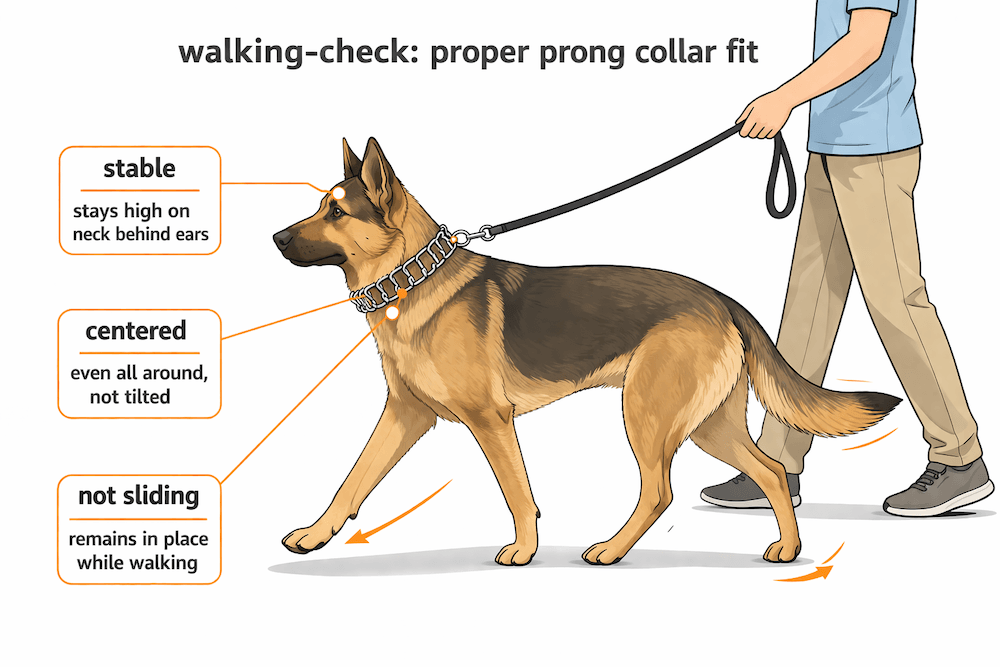
Reconnect the link once the collar is around the neck. The collar should sit snugly, remain high, and not sag or rotate when your dog moves lightly.
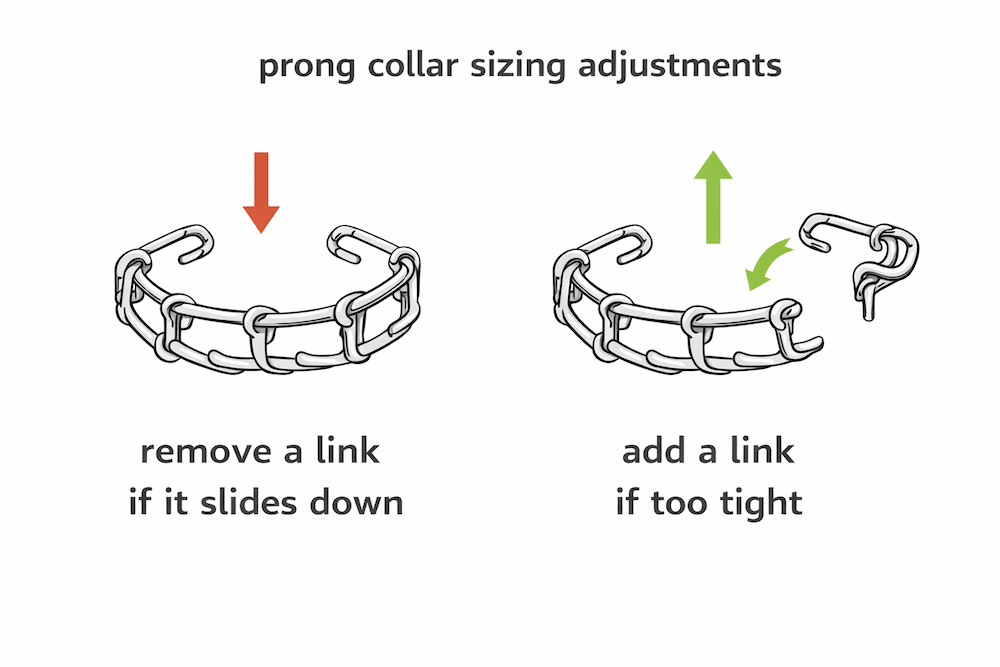
Step 5: Adjust Link Count if Needed
If the collar slides down, remove a link. If it looks overly compressed or creates constant pressure without leash tension, add a link.
Step 6: Attach the Leash and Confirm Stability
Clip the leash to the active ring and let your dog stand or take a few quiet steps. Watch whether the collar stays in the high position instead of drifting down the neck.
Step 7: Remove It After Training or the Walk
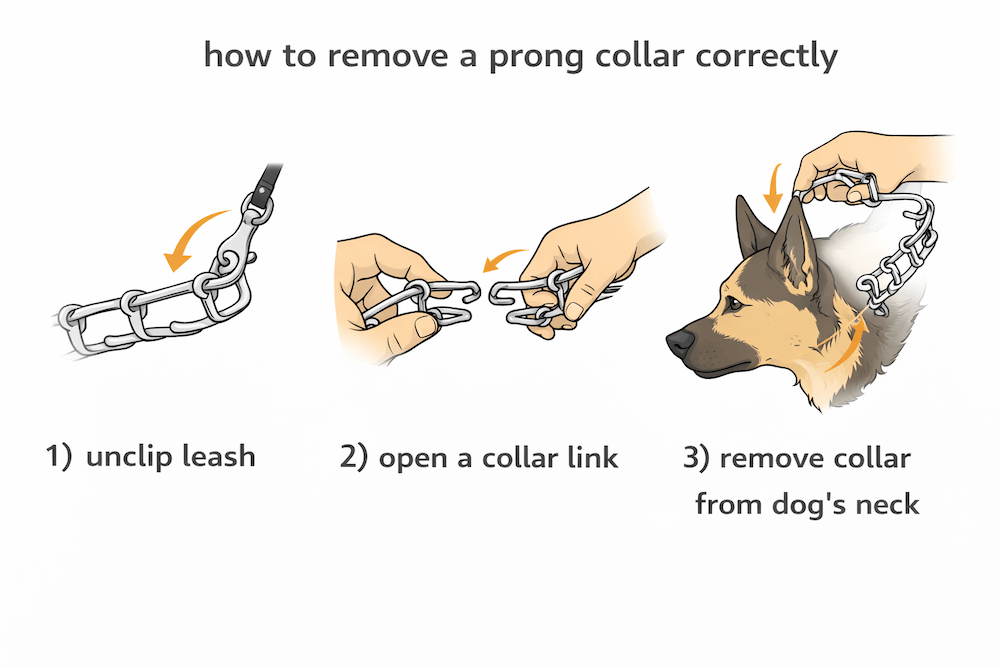
When you are done, unclip the leash, open a link, and remove the collar. Prong collars should not be left on for lounging, crating, or unsupervised time.
Safer Alternatives to Consider Instead of a Prong Collar
Many dogs do better with fewer aversive walking tools, especially when the main goal is better leash manners rather than quick physical control. The best option depends on your dog’s size, strength, sensitivity, pulling habits, and how much training foundation they already have.
In many cases, a safer tool paired with consistent loose-leash training can give owners enough control while also helping the dog learn what to do instead of simply reacting to pressure. These alternatives can offer safer, more practical control for many dogs.
What Research Says About Using a Prong Collar on a Dog
The biggest evidence-based point is not about a special fitting trick. It is that veterinary behavior organizations advise against aversive tools, including prong collars, and recommend reward-based methods because there is no evidence that aversive methods are necessary for routine training or behavior modification.
A 2017 literature review found that aversive training methods can jeopardize dogs’ physical and mental welfare and found no evidence that punishment-based methods outperform positive reinforcement. That matters here because the question is not only how to place the collar, but whether using it adds benefits that safer methods cannot.[1]
A 2020 study in Frontiers in Veterinary Science comparing e-collar training with training centered on positive reinforcement found that the reward-focused group performed at least as well, and in some measures better, without the same welfare concerns. While that study was on e-collars rather than prong collars, it supports the broader clinical point that aversive tools are not required for effective leash and obedience work.[2]
A 2024 peer-reviewed review in Animals summarized that dogs trained with aversive methods often show more stress-related behaviors and can perform worse on some learning and affect-related measures. Clinically, that matters because a collar that “works” in the moment may still worsen the dog’s stress picture or owner-dog relationship over time.[3]
Extra Tips for Putting a Prong Collar on a Dog
This covers handling and fit habits that can make prong collar use more stable, controlled, and easier on the dog.
| Tip | Why It Helps | How to Apply It |
|---|---|---|
| Fit it high | High placement improves stability and reduces lower-neck pressure. | Set it just behind the ears and under the jaw. |
| Keep it snug | A snug collar stays centered instead of twisting downward. | Remove or add links until it stays put. |
| Use short sessions | Short sessions reduce friction, stress, and overreliance. | Use it only during the walk or training block. |
| Watch the neck | Early checks help catch rubbing or pressure marks. | Inspect the skin after each use. |
| Reward good walking | Rewards teach the skill instead of only interrupting errors. | Mark loose-leash moments with treats or praise. |
| Stay calm | Calm handling lowers tension for both dog and owner. | Fit the collar before excitement builds. |
Common Mistakes When Putting a Prong Collar on a Dog
This shows the most frequent fitting and handling errors that can make a prong collar less effective, less consistent, and more stressful for the dog.
| Mistake | Why It’s a Problem |
|---|---|
| Wearing it low | Low placement makes the collar slide and work unevenly. |
| Leaving it loose | Loose fit causes sagging, rotation, and inconsistent pressure. |
| Pulling over head | That can distort the fit and stress the dog. |
| Using it all day | Extended wear raises snagging and irritation risks. |
| Skipping training | The dog learns less if the collar replaces instruction. |
| Using harsh pops | Harsh corrections can increase stress and confusion. |
When to Work With a Professional Trainer
Some dogs should not be introduced to a prong collar without help from a qualified trainer or behavior professional. That includes dogs who pull intensely despite prior training, show fear or shutdown on walks, lunge or bark hard at triggers, have a history of aggression or redirected biting, cough or gag in training gear, or behave in ways the owner does not know how to read.
A good trainer can help decide whether a prong collar is appropriate at all, rather than assuming it is the right next step. They can also check the fit, show proper leash handling and timing, help build loose-leash skills without overcorrecting, and figure out whether the real issue is fear, frustration, overstimulation, or a weak training foundation.
In many cases, the bigger solution is not the collar itself but the training plan behind it. Reward-based training and a clear behavior assessment usually matter more than the tool, especially when a dog’s walking problems are tied to emotions, stress, or confusion.
Frequently Asked Questions
The Bottom Line
A prong collar should only be used with careful fit, clear handling, and a realistic understanding of what it can and cannot do. Putting it on correctly means placing it high on the neck, adjusting it so it stays snug without sliding, and using it as part of a thoughtful training plan rather than as a shortcut. For many dogs, safer tools and reward-based leash work may be a better fit, especially when the real problem is fear, overarousal, or a lack of training foundation. If your dog seems stressed, reactive, or physically uncomfortable, it is worth stepping back and getting professional guidance before continuing. In the end, the goal is not just better control on walks, but safer, clearer, and more confident communication between you and your dog.